


Adventures with Brook the Bus - A 2006 GMC Savana 3500 Skoolie
When I first met Sean, he had been dreaming of living in a bus for over five years. He had the floor plan he wanted taped out on his bedroom floor and a list of everything he wanted to include in the build. I had never heard of anything like this before! I had always dreamed of traveling around in a vintage VW Van (like everyone does), but I quickly became enamored and stoked about the idea of bus life.

We met during our junior year of college right before the pandemic hit the US in March of 2020. “Zoom University” as we called it gave us the opportunity to spend every spare moment we could camping, hiking, backpacking, or skiing while working on our B.S. degrees in Engineering Physics.


Doing our own Skoolie conversion together quickly became our new dream, and after graduating in May 2021, we worked our butts off and saved up enough money to buy a short school bus! After two plane rides to New York, two new spark plugs in New Jersey, and one new tire in Pennsylvania, we arrived back home in Colorado with our very own 5-window short school bus named Brook (short for Brooklyn, New York).
There is a good reason why doing a school bus conversion was Sean’s dream – buses are awesome! Bus ceilings are tall enough for Sean to stand up straight (he’s 6 feet tall), they are usually well maintained by the school district and can last for hundreds of thousands of miles, their frame is significantly sturdier and safer than an RV, the amount of natural light from all the windows is amazing, and we feel that buses allow for more creativity during the conversion process than any other vehicle.
We specifically picked Brook over other buses because she is only 22 feet long and can fit into any regular parking spot, and she is a handicap accessible bus so there is a back door as well as a side door. The extra side door was specifically what we wanted so we could have two points of outside access to the storage area under the bed.
We would like to think that our conversion story is unique because we did not have a workshop or place to work on Brook other than our parent’s driveways and garages. Most of the conversion and build was done with a jigsaw and a screwdriver! Sean and I were also both working full-time jobs, so a lot of the work on the bus was done during late summer nights.

The very first thing we did was get rid of the garish bus-yellow paint, mostly so we could park the bus without making the neighbors too upset. Both Sean and I love the color purple, so we chose Lavender Sky to cover up the yellow. We decided not to use a paint spraying gun and opted to hand-paint Brook instead. This worked out well for us, but if we were working on a bigger rig, spraying on the paint would definitely be more efficient!
After sanding down the yellow and creating a rough surface, we applied two coats of Behr exterior house paint (the good stuff) and finished with one coat of our Lavender Sky. The great thing about the paint we chose is that it didn’t require a sealing coat, and after months on the road it’s still holding up great. I am a professional watercolor artist, so painting the outside of Brook was definitely my favorite part of the demolition process!
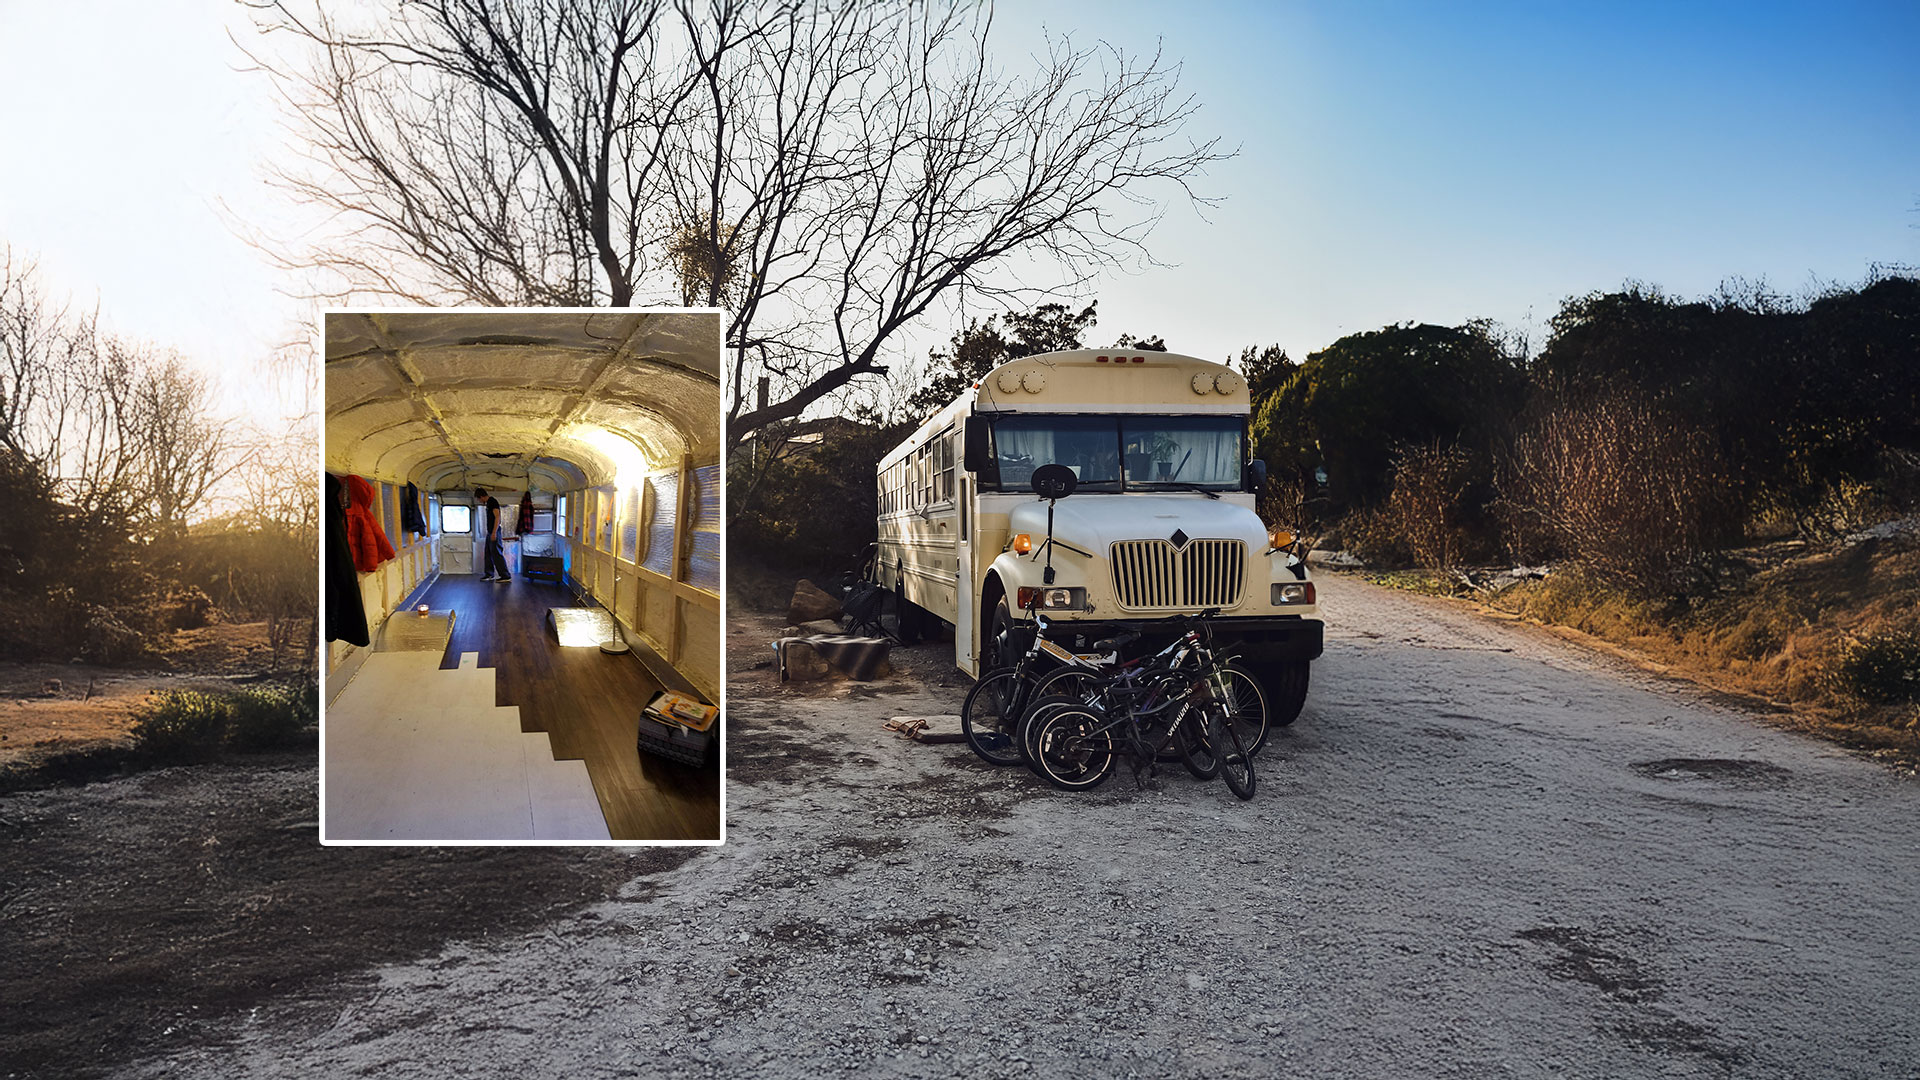
After the outside was looking good, we moved on to tackle the inside. We removed the seats, all the layers of the floor, the inside walls, the ceiling, and all of the insulation. Completely gutting the bus let us check how much rust, if any, was on the floor and body of the bus. I have terrible allergies, so I also wanted to get rid of any insulation that looked moldy or gross just in case. One of the harder things to remove was the wheelchair lift in the back of the bus.

The lift was extremely heavy, and the bolts that held it to the bus frame were so rusted that only the Sawzall blade would cut through them… eventually. Luckily, even after sitting unused in New York for a year, there was minimal rust damage to the floor. We sanded down the few bad spots that there were and treated everything with a coat of Rust-Oleum protective enamel paint. This paint helps repair rust damage while preventing new rust from forming, so it was definitely worth the money and time for the peace of mind.


We used an angle grinder to grind down all the inside rivets and screws, allowing us to sort of just pop the ceiling and sidewall panels off. The bus came with an overhead A/C unit attached to the roof of the bus over the windows on the driver’s side. This was where we wanted our kitchen to be, but Sean’s face would be smacking into the A/C unit any time we tried to cook, so we decided to move the unit to the very front of the bus over the driver’s seat. Moving the A/C unit was a long process (it’s ridiculously heavy), and it spent most of the conversion sitting on the floor of the bus before reaching its final resting place.
Before working on the bus, I had basically no experience with power tools and was honestly afraid of them. But demolition helped me gain confidence in myself, and I’ve never felt more badass than when I was using an angle grinder with sparks flying. Taking everything out of Brook was the longest part of the build, and the whole time Sean and I kept saying to each other “Wow, I couldn’t imagine doing this on a full-size bus.” We appreciate our little space and gained so much respect for everyone converting big buses!

Now, onto the fun part: putting things back into Brook. Our basic floorplan included a double mattress at the back, the kitchen along the driver’s side, shelving above the kitchen and bed, a storage closet/bathroom behind the driver’s seat, a seating area along the passenger side of the bus, and a wood-burning stove by the bed. We started with our subflooring and flooring - we didn’t have much wiggle room since we wanted to make sure that Sean could fully stand up.
We used 1-inch-thick foam board insulation on the ceiling and walls and decided to just use a layer of ½ inch thick plywood as subflooring. Our neighbor gave us some leftover vinyl flooring they had, which was perfect to lay underneath all of our storage areas: the bench, the bed, and the kitchen. We were also given an incredibly comfortable full-size mattress from my roommate! Most of the dimensions for framing were based off of the mattress size.
Under the bed is our biggest storage area, and because we bought a handicap accessible bus, we have two doors to access this storage. We placed our electrical and propane on the side of the bed so it could be accessible from the side.
The rest of the space under the bed is accessible from the back door and fits SO many things: two pairs of skis, a snowboard, boots, two longboards, two pairs of snowshoes, a spare tire, all the tools we accumulated, backpacking gear, tent camping gear, extra firewood, and other odds and ends.
The handicap features allowed us to keep our electrical and propane system safe from the rest of our gear. We chose to use products from Renogy for our electrical system and installed the system ourselves.
We liked this company because they sell solar kits as well as individual parts so we knew that everything would be compatible, and their customer service is awesome. We called them a few times to make sure we had the right fuses to protect the battery and charge controller and they were very knowledgeable and helpful.


Our electrical needs are essentially just a fridge and lighting, so we went with two 200-watt panels (400 watts in total) and mounted them directly to the bus roof. We also have one AGM Deep Cycle 200 Amp-hour battery and a 2000-watt sine wave inverter from Renogy. We had a lot of fun doing the electrical – it turns out we did learn a thing or two while studying engineering! The moment we plugged in our LED lights and they turned on was one of the best moments of the build.
The color-changing LED light strip is our main source of light inside the bus, but we also have two sconces mounted above the bench. The sconces can swivel up and down and rotate in a circle, so we can use them like spotlights to light up any corner of the bus or give us better lighting to paint and draw. Each light has its own power cord with a switch, so we can easily have one or both on at any time.

Another unique feature of handicap buses is that the floor is actually built on top of the wheel wells. Because of this, there are about 14 inches of space between the underside of the floor and the bottom of the bus’s siding. It turns out that this is the perfect size to fit two 5lb propane tanks mounted below the floor.
We asked a local welder to help us make a box to place the propane in, complete with holes at the bottom to allow the propane to vent out in case of a leak. This is the one part of the build where we paid a professional for help and we are so glad we did! Our propane tanks are nice and protected, and we don’t have to get dirty or wet to refill our tanks.

When it came time to buy appliances, we did our best to find the middle ground between cost-effective and quality options. We chose the Cubic Mini Woodstove, Cub model as our source of heating the bus (and nothing beats the aesthetic of a crackling fireplace). If you plan on traveling through cold places, we would highly recommend having a wood stove. It even kept us warm when it was -11°F in Wisconsin! Make sure you don’t install your stove too high off the ground: it does a great job of heating the air above it, but any air below the level of the stove will still be cold.
Cubic Mini Woodstoves offer an exit kit for safely creating a chimney that goes through the bus roof, as well as a little quiz to help you pick the right size stove for your bus. Wood is a dry heat source and takes moisture out of the air instead of creating water as propane heating does, so we kept a small metal pail full of water on top of the stove while it was burning so the water could evaporate and replenish the moisture in the air.

We have a 30-quart low-draw top opening fridge from BougeRV. It does not have a freezer, but we found that it fits the perfect amount of food for our needs. Next to the fridge, we have a two-burner propane stove and oven combination from Camp Chef. The stove we have is marketed as an outdoor stove, so we made a fireproof “box” around it out of insulation and concrete board to be extra sure that our wood framing and countertop would be safe. We haven’t had any issues with it and it’s so nice to have an oven! We even made crab cakes while we were in Florida.


After some debating, we decided not to create a specific area for showering inside the bus for several reasons. First, creating a waterproof space correctly is difficult and the materials would add a lot of weight to the bus. Showering also requires having lots of fresh water, and we simply did not have enough room to store that much fresh or gray water.
We did install a tankless water heater that hooks into our water pump and propane system so we can have the option to shower outside with hot water. We make do with washing our hair over a bucket and seeking out a Planet Fitness whenever we could! (Bucket showers definitely make you appreciate a real shower). Without a shower, we were able to have a huge closet storage space to house two pop-up tray tables and our Dometic portable toilet.


As artists, we both had ideas on how to make our space colorful, exciting, and unique. Sean loves working with wood, so we decided to make our own custom 26” x 68” butcher block countertop out of Purple Heart, Cherry, Walnut, and Maple wood. We used wood glue to seal the strips together and made our own jig system to hold it together while it dried. After sanding and some epoxy, we couldn’t believe how good it turned out!

While we were building the bus, I was so excited to find some Talavera tiles in New Mexico to decorate and insulate the area around the stove. Since the beginning of Sean’s bus life dreams, he had the idea of making a rock river flowing down the center of the floor. We bought some black river rock tile, removed the pieces from the net, and laid them all out onto the floor. Then, we traced the shape we wanted, took the floor back out, and used a jigsaw to cut the flooring boards into curvy shapes. My dad taught us how to tile, and within two days we finished laying and grouting the stove area, the kitchen backsplash, and our river rock floor. We’re particularly proud of the floor – we even have a kitchen island! (Get it?).

I had seen quite a few Skoolies on Instagram with beautiful murals on the outside, and I wanted to do some artwork of my own to spice up the outside of our build. I painted a mural of the Colorado Front Range mountains to remind us of home on our travels. I used the same outdoor paint as the rest of the bus for longevity. I’m hoping to add to this mural with paintings of our favorite places as we continue to travel.
Across from the kitchen, we created a bench that flips up for storage and pulls out into a full guest bed. We made our bench big enough to fit three 7-gallon jugs of water underneath it, as well as all of our art supplies. We purchased two outdoor lounge chair cushions to use as padding for our bench. One of the last things we did was build a 14-ft long shelf that stretched across the kitchen and bed.
We added baskets to serve as our pantry, closet, and bookcase. We used sheets of thin finishing plywood on the ceiling as well as mounting a swath of corkboard above the bench. The corkboard has been a perfect place to pin up paintings, postcards, pictures, and collectibles from our journey. We finished off the kitchen with a concrete sink from Home Depot and a 12V RV water pump. The sink directly drains into a 5-gallon gray water tank that we can remove and empty by hand.

Another one of our favorite additions is our magnetic spice rack right above the sink. We ended up being thankful that we didn’t have more complicated plumbing because absolutely everything in the bus froze solid a few times (including our olive oil!), and we would’ve had a lot of split piping and leaks to deal with.

And after all of that, it was time to move into our new tiny home on wheels! Both of us were incredibly surprised by the amount of storage space we managed to create. It’s amazing how big 140 square feet can feel when the entire space is open and surrounded by windows.
From driving Brook home on July 25th of 2021 to leaving for the east coast on November 20th 2021, Sean and I worked so hard and learned so much about each other. We’ve been traveling full-time for seven months now and we can say without a doubt that tackling a Skoolie build is the best, coolest, and the craziest thing we’ve ever done. So far, we’ve traveled from coast-to-coast, through 25 states, and have visited 24 National Parks and Monuments.
We have driven all the way to the southernmost point in the Continental US in the Florida Keys and up to sub-zero temperatures in Minnesota and Wisconsin. We’ve had a kaleidoscope of experiences including kayak camping on Florida beaches, rock climbing in Sedona, skiing Kachina Peak in New Mexico, hiking to the bottom of the Grand Canyon, snowshoeing through a volcano, and visiting over seven cliff dwelling and ancient pueblo sites.


Our favorite state so far has been New Mexico. We were there for over a month and it felt like the embodiment of bus life – happy, free, and a little bit dirty. They have it all: epic skiing, crazy dunes, beautiful deserts, and delicious food. New Mexico is also home to our favorite spot to camp, nestled at the end of a slot canyon with rock walls and stars towering over us.

Everyone who has converted a Skoolie knows that the conversion is never really done: there’s always something on the list to fix, add, repair, or tweak. Living in such a dynamic space keeps us excited and we certainly have never had a boring day.


We have lots of big ideas for improvements we want to make to Brook over the next few years while we live, study, and work in the PNW, but we honestly can’t think of anything we wish we did differently! The first thing on our to-do list is to improve the insulation around the windows. We’re really excited to give Brook a rooftop deck and get her ready for a long journey to Alaska.
We are so thankful to our families and friends for helping us out with the building process, letting us do way too many loads of laundry in their homes, playing tour guides, and making sure we were well fed. Bus life has allowed us to create so many new wonderful friendships, brought us to absolutely incredible places, and has already given us a lifetime of memories. If you ever see our little purple bus out in the wild, come say Hi! We’re always excited to meet more bus folk and swap stories.
You can contact Xan and Sean at brookthebus@gmail.com for any inquiries about their build, artwork, or anything else.
to open the company's website.