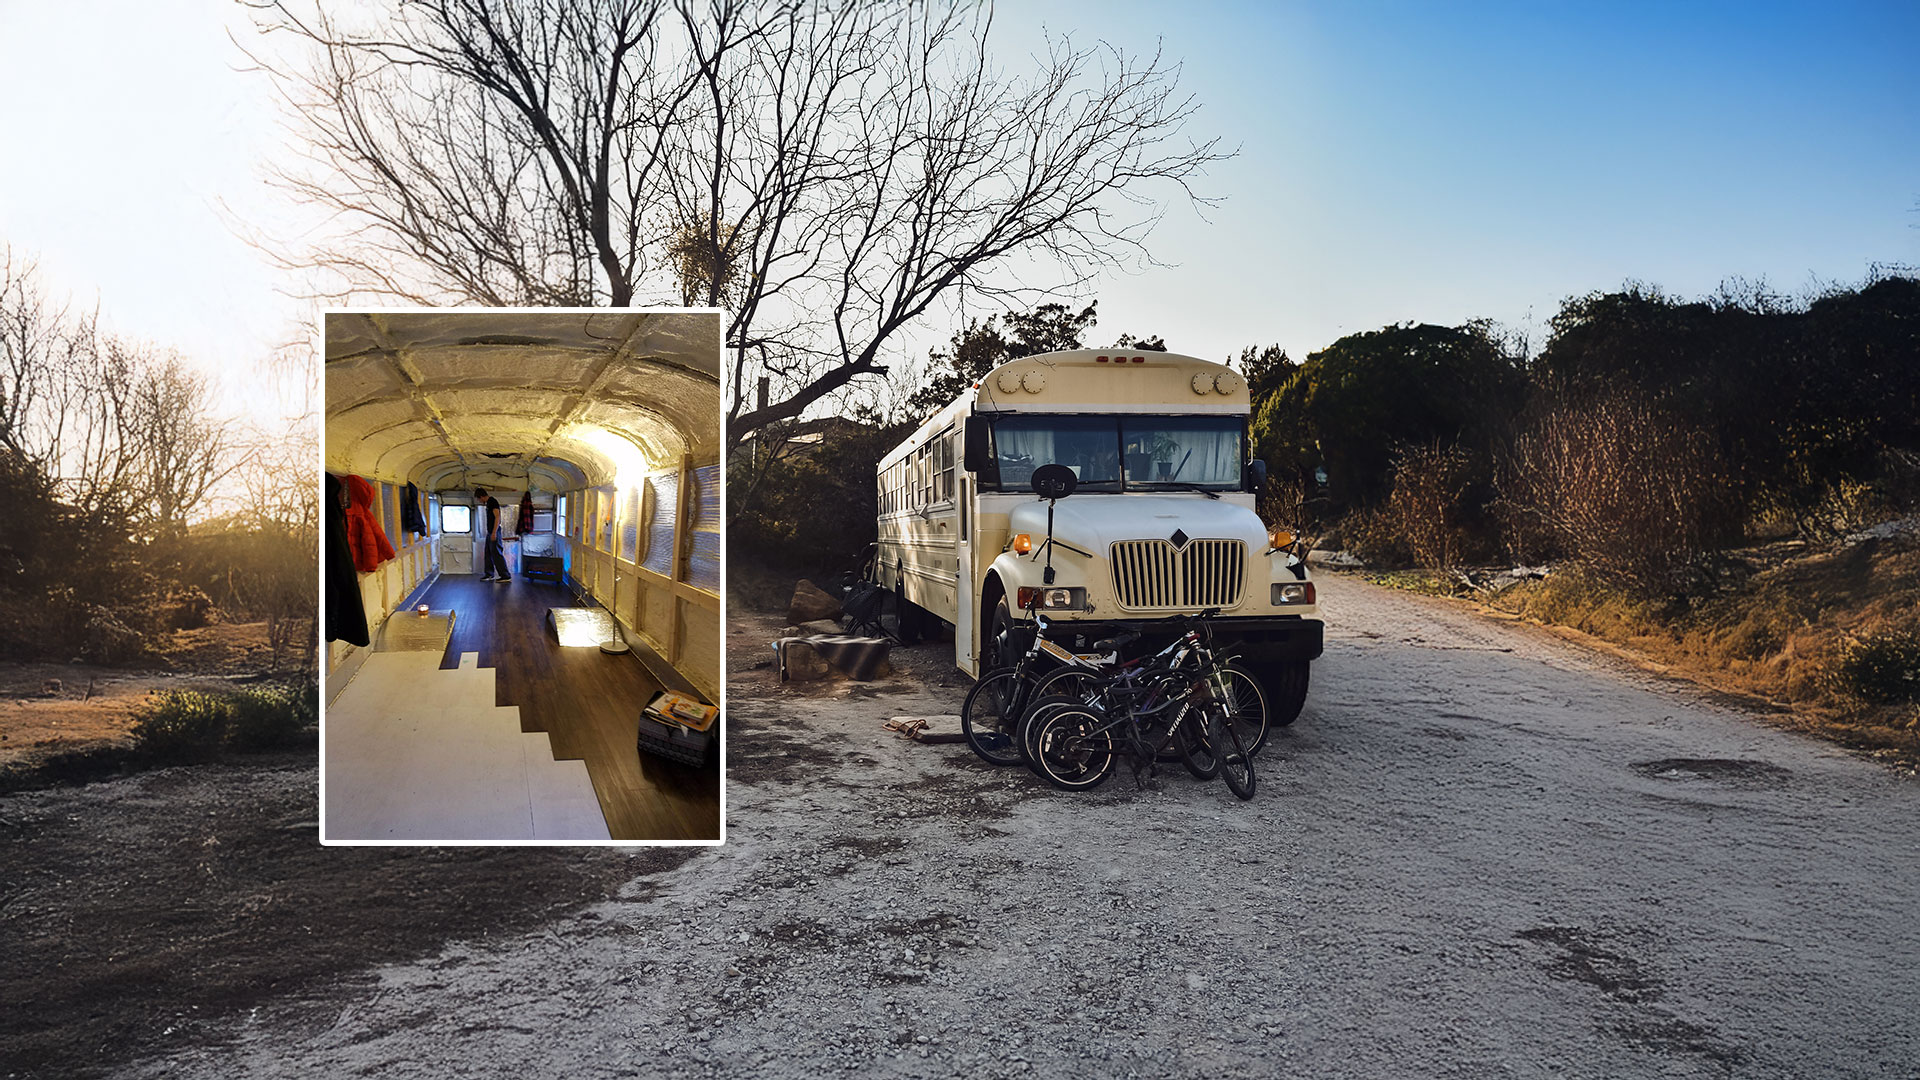
The Enterprise - A 1995 Thomas MVP Saf-T-Liner (Skoolie)
We were stuck. We were stuck in a life where Buslivin dad Gary, was working all the time. He is a Heavy Equipment Operator/Foreman. Sometimes his job takes him away from the family, sometimes out-of-town, for what at times felt like forever.
He was working to pay for all the things the family needed. He was paying for the roof over our head, that he rarely had the pleasure of sleeping under. He had been working in Redwood City, California for the past five years, and the family was living in Elk Grove, California (119 miles away). It was during this period we decided it was time for a change.
The solution, bring the home and the family to him. We began looking at RVs, trailers, and motorhomes and we were immediately unsatisfied with what we were getting with such a heavy price tag. Somehow, we stumbled onto Skoolies, and we knew immediately, this was the answer.
We spent about three years studying: watching YouTube videos, Google searches, reading blogs, joining Facebook groups, etc. We were determined to learn everything we could about full-timing, boondocking, Home-Schooling, tiny living, and minimalism.
Then there was the bus search, Gary looked at all kinds of websites. He set out to look at a few buses; those fell through or were sold out from under us. We almost purchased an MCI Coach that was already converted to suit a retired couple. The cost of the bus was at the top of our spending limit, which left no funds for renovations.
Gary wasn’t really set on a specific make or model, mostly he was searching for a pusher with a Cummins or a Caterpillar engine and it needed to be around forty feet long. He eventually found her; the ad was on Craigslist in Olympia, Washington. The gentleman had purchased the bus to do exactly what we were doing, but he just hadn’t gotten to it and his wife was insistent on him getting rid of the big yellow beast in their yard.

When we started this journey we were in a three-bedroom 1,400 sq. ft. duplex. We downsized to a 725 sq. ft. cabin in Alta, California. That is where we were when he brought the bus home in 2015, that is where the entire conversion happened. Shout out to the entire town for putting up with our noise!
My husband and I did most of the conversion ourselves, with some help from family and friends on things like painting, flooring, and electrical work. We did the work in our spare time after work and on weekends.

The Enterprise conversion started with taking out an emergency exit and windows on the driver’s side where the toilet and fridge were going. We then took out two sets of two and a single window on the passenger side. One set where the shower and oven were going and the other was behind the wood stove and bunk area. The single window was also where the bunks were going.
We closed those up with 3mm (11 gauge) sheet metal we had cut to size at the local HVAC shop. We then caulked and bolted the sheet metal to the frame. We decided not to weld these in, in case we wanted to renovate later.

We sanded down the entire bus and then cleaned the outside from top to bottom. We then got it taped off and primed the bare metal.
We knew we wanted blue, but we let family and friends vote on Facebook between the three shades each of us had picked. We ended up using Behr outdoor house paint. The votes were tallied up for Mountain Lake (Gary’s pick).


We decided to use house paint so that no matter where we were if there needed to be a touch-up, all we had to do was stop at our local hardware store and have them do a paint match. We painted the entire bus with paintbrushes and rollers.
It took two coats; however, as I write this article, this paint job has been through three years of rain and snow, as well as super hot California heat. No fading, chipping, cracking, or peeling. We decided to keep the roof white. We coated it with Henry’s 100% Silicone Tropi-Cool.
Under the bus, we have two huge compartments that go straight through to the other side. In these compartments, we store our thirty-gallon black water tank, our thirty-gallon gray water tank, two five-gallon propane tanks, two tool boxes, and our Harbor Freight Predator 3500 Series Generator.
Gary fabricated a rack to hold our forty-gallon fresh water tank. He made it out of angle iron and plywood, using ¾” foam insulation and rubber from the flooring we tore up to cushion between the rack and the tank and to keep the tank insulated. It is mounted under the bus, behind the front passenger side wheel well.


Next, we ripped out all of the seats, which was not an easy task. We ended up having to use an angle grinder on every bolt because the seats were bolted in from the bottom of the bus. The neighborhood collectively took all the seats from us, making things at their homes like breakfast nook seating and gazebo seating.

We then ripped up all of the floorings, and checked the plywood subfloor for signs of rot or rusting, we found none. We then stripped down the walls, ceilings, and anything else that needed to go. We loved the metal ceilings and liked the original bus look.


Our main goal with this conversion was to keep it looking like a bus but make it a cozy home as well. So, we re-painted the original metal ceiling a brighter, high-gloss white, and put the original light fixtures and speakers back until we could afford upgrades.
The metal ceilings have become one of the most used and noticed features of our tiny home; we hang everything from the ceiling. Things that are magnets in our Skoolie: remotes, spices, art, notes, bottle openers, and well you get the hint. So far, nothing goes flying while driving!

We attached ¾” foam board to the inside walls and then covered that with ½” plywood. I put wood putty in all of the screw holes, sanded the walls down, and painted them with high gloss grey.
Everything is painted with high gloss and darker colors because, kids. We then trimmed everything out in a mixture of different trims all stained with the color gunstock.

We are running PEX for our water lines with SharkBite fittings. We have a six-gallon (Suburban) gas/electric hot water heater. We have four Renogy’s 100W panels, Renogy’s Rover 40A solar charge controller, two Duracell platinum AGM 27m AGM batteries, and a 45A MagnetTek converter charger with 30A hook-up.
We began our build at the back of the bus, with our queen size bed, which was later upgraded to a King. The bed is built over the engine compartment, so it is two and a half feet off the ground, which made it comical and inconvenient when I was very pregnant.
All underneath the bed is storage, which is where we keep extra blankets, my two totes of clothing, our solar batteries, and our inverter/converter. Later, hydraulic bed lifts were added to this so it was easier to lift and stays open.
The cabinets above the head of the bed were not easy to build either. Gary had to make a template out of a foam board to establish the correct curves. There are also shelving units built into the walls at the foot of the bed.

Next, we built the bathroom, which is divided between both sides of the aisle. The Toilet and Vanity are on the driver’s side and the shower is on the passenger side. There are two sets of swinging doors (old closet doors) that can separate the bus into three sections, living and kitchen area, bathroom, and master bedroom.


The shower pan is built to hug the other rear wheel well. The shower needs to be redone. It was thrown together at the last minute because we just could not decide how we wanted it done. However, our friend Tim Briscoe from Central Oregon Building & Plumbing Contractors has offered to make us a shower of beauty.


Gary’s brother Kelly got us the fiberglass RV shower wall and this shower tub for free. I sanded it, cleaned it, and then coated it with Rust-Oleum Appliance Epoxy. It has worked very well and the paint job has held up nicely.
Our kitchen is my favorite part and the countertop is my favorite piece in the entire home. Gary and a friend built the kitchen countertop, drawers, and cabinets. The stove is a propane Wedgewood that we bought used from a friend.


My first attempt at the countertop was started with polyurethane and it survived about a year before I ended up stripping it all down, starting over, and sealing it with Epoxy. It is now heat and moisture-resistant, not only that, but I was able to add pictures of our son that were not on there before.


The first refrigerator we had was a refurbished 3-way. It was great, after traveling being able to throw on the propane and wala. But, that California heat was too much we just could not keep our food cold and we started losing food.
We now have a small apartment fridge that we got at Lowe’s.
The chalkboard is leftover metal from closing in the windows we took out. I chalkboard-painted the metal and Gary made a frame, now we have a magnetic chalkboard and it is used all the time!

The dining room table/guest bed seats are reclaimed chest found at the local Habitat for Humanity. We cut it in half, rebuilt the side to one, and painted them black and those now serve as our dining room table seats/storage.

The table top was a picture we had hanging in our home for a long time. We cut it to fit in between the two seats so that this dinette can be changed into a guest bed. Gary took the scrap pieces he had cut off and used that to build the mounts for when it is resting as a bed and on the wall for when it is in table mode. The guest bed measures 3’ x 6’2”.

One of the first bus trips we took was to the Mendocino coast, which is where my Aunt taught my thirteen-year-old how to use a sewing machine. Since she learned this amazing skill we have made one set of master bedroom curtains, and one front door curtain and we made cushions for our dining table/guest bed.


Above the dinette is the entertainment area. We have an X-Box One that has its own shelf mount on the wall. We have a VIZIO Smart TV which is on a 6-way swivel Sumar mount. We have a Polk MagniFi-Mini sound bar, which also has its own shelf to live on behind the TV.


A gentleman in Alta had the woodstove on his property; we bought it for fifty dollars. It has really cool engravings on the sides of a miner panning for gold. It is 1’ wide by 1’7” deep.

Gary made a wood storage area underneath with masonry work for it to rest on. He secured cement board and sheet metal to its surrounding area to protect the wood from the heat. Having the wood stove has been amazing. Although it is hard to store and transport a supply of wood, it keeps the moisture to a minimum and it warms up fast. I have also used the wood stove to heat up food and water for hot cocoa and such.

We have two bunks at the front of the bus. Our daughter’s bunk measures 2’9” x 7’5”. There is a bookshelf at the foot of the bunk which really makes her sleeping room about 6’4”. We got a mattress from IKEA, with added foam underneath.
The baby has the bottom bunk and it is built to hold a crib mattress. My daughter has two large drawers built over the passenger side front wheel well, and two medium totes under the bunks. Baby has a cubby above the drawers, a cabinet above the co-pilot's seat, as well as two bins under the bunks.


The flooring was a Habitat for Humanity find. It is laminate tongue-in-groove; we picked up 175 sq. ft. for $25. I have no complaints a year and a half later. The way we laid it, however, we should have done the flooring before building the inside. We thought we would save on how many square feet we would use if we are just flooring the aisle.
It ended up being a big pain cutting around the build and we wasted more than we saved. We ended up running out of what we bought right at the bathroom line. I was not about to spend time trying to match old flooring. So, we ended up buying those sticky tiles from Home Depot for the bathroom. Now, if we ever have to replace it, it will be easier than if we ran it under the walls.


We have about eight battery-operated touch lights that I have glued magnets to the back of. It is great because you can really put them wherever you need them.
We also have two LED RV lights running off of DC, as well as two LED AC lights in the bedroom.
The driver’s seat came with the bus. It is a Liberty II Bostrum. The Co-pilot’s seat is a van seat from Pick-n-Pull. The baby has a seat belt mounted to a landing, rear-facing behind the driver’s seat.


The question I get asked the most as the bus-living mom is about laundry. We thought about getting a washer/dryer combo when this first started. However, it won’t happen now. I have decided I would be constantly doing laundry (one of my least favorite chores).
I like going to the local Laundromats. Those bulletin boards are where you find out about everything. They have classes, help wanted signs, local bands, community events, and so forth. Once a week, we spend two hours and get the chore done, walk around local shops, not to mention usually we go to different Laundromats for variety.
We have been to places like Fort Bragg, Tulelake, Crater Lake, and Joshua Tree. We have been to states such as Oregon, Washington, and Arizona. We visited with friends and family. We have seen and experienced so much and we have just started.


This journey, so far, has taught me how to best communicate with my husband. It has empowered us as a family. We dreamed up something, and our family and friends thought we were/are “crazy.”
They were supportive but puzzled at the same time. They had questions at times; we didn’t have the answers to them. “We’ll figure it out,” seems/seemed to not be enough.
Well here we are, two years later, and we are still rolling. Not only are we succeeding, but we are also rocking it. We have paid off a debt that has been hovering over us nearing a decade. We save money like never before. I landed a sweet job working remotely for Bus Conversion Magazine. We are living the dream!
“I love that after all the hard work it feels like home. I go there to relax and unwind.
Home can be where you park it. “
-Gary VanDenburg
You can follow the @Buslivin adventure on Facebook, Instagram and YouTube.
You can also contact Sandra via email: Sandra@BusConversionMagazine.com
to open the company's website.