• Ardemco Supply Banner AD
  • Thinkware Dash Cam Banner AD
  • Bus Manuals Banner AD
  • Tire Table New Banner AD
  • Flame Innovation Banner AD
  • National Bus Trader Banner AD
  • Straight Line Banner AD
  • Bus Manuals Banner AD
  • Unforgettable Fire Banner AD
  • Midwest Bus Parts Banner Ad
  • Superior Driveline Banner AD
  • National Bus Trader Banner AD
  • Midwest Bus Parts Banner Ad
  • Tire Table New Banner AD
  • Ardemco Supply Banner AD
  • Straight Line Banner AD
  • Superior Driveline Banner AD
  • Bus Manuals Banner AD
  • Thinkware Dash Cam Banner AD
  • Unforgettable Fire Banner AD
  • Bus Manuals Banner AD
  • Flame Innovation Banner AD
Wes Young and Sandra Fawcett
November 5, 2021
170 views

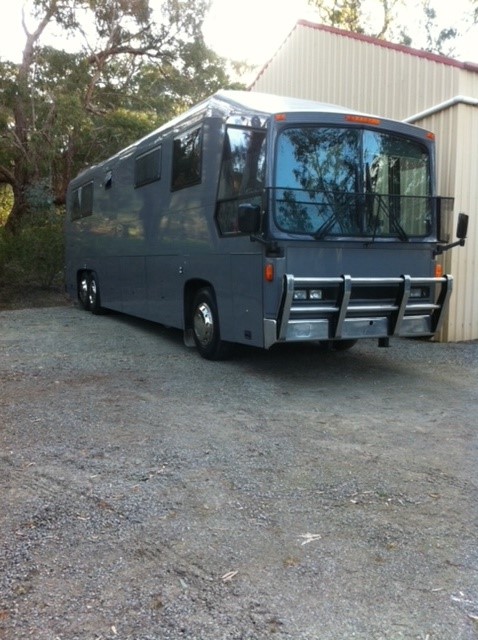
Thor – A 1988 Austral Tourmaster in Australia

“Why are you taking on the job of converting a coach into a motorhome, aren’t you already busy?” That was a common response when we told our friends we were going to convert a bus into a motorhome and travel all over Australia. So, who are we and why did our friends think we were mad? Our names are Wes and Sandra and we ran a cattle property in the Adelaide Hills of South Australia. Besides the cattle, we both had off-farm jobs to supplement the farm. Wes was a diesel mechanic and Sandra worked for the local government as a town planner. In addition, we had sporting interests, Wes raced Formula Fords, becoming a state champion whilst Sandra was heavily involved with the volunteer firefighting service being a trainer and holding a high rank. Now I can hear you all saying, how did they have time to convert a bus, leave everything, and travel in Australia? We made sacrifices, Wes stopped racing which gave us more time, and then as the build progressed, he left his job to concentrate more on the project.

Finding the Bus

When we decided we were going to travel to Australia for a few years, we also decided we would do it in a bus. It was larger than a van, had much more storage capability, and was a bit different.

There weren’t too many bus conversions in Australia so our idea was a bit unique. We started surfing the internet looking for already converted buses but after a short time it was clear to us that they were either out of our price range, the lay-out was not to our liking or they were very poorly completed.

We even decided to take a couple of trips to look at a few buses which were partially converted or just gutted hulls of buses, this also came to no fruition. We continued searching and finally came across an advertisement from a major tour service coach company selling off a few of their older service coaches.

We set a time to have an inspection of two coaches and on arrival, Wes had a surprise as the service manager was Wes’s former workshop foreman when he was an apprentice for over 30 years prior. What a great reunion for them, after all the reminiscing, we drove out with our new home ready to undertake our adventure.

Our choice was based upon the service history of the motor. It had been rebuilt and was newer than the other coaches offered and the gearbox was only halfway through its potential service life, which in comparison we were not going to do the mileage it was currently subject to. In our case, it was a good mechanical decision.

We bought the coach as soon as it came out of service in 2014, so we knew it was fully operational and roadworthy. The coach was used to travel from Adelaide to Ceduna on a scheduled service run and on occasions it went along the Strzelecki Track into the outback of Southern Australia.

The coach in the original service paint scheme.

Gutting the Bus

We were lucky in a way as the company offered to remove all the seats, leaving only the first row so we didn’t have to undertake the arduous task of removing 20 rows of seats and then disposing of them. Once the registration was transferred into our names and all the seats were removed, we drove the coach home. This was the first day of our adventure.

Editor’s Note: If you buy a bus with seats still in, try to convince the seller to remove the seats. Frequently they will do this for free in exchange for keeping the seats saving you of the hassle of removing and disposing of them.

The first job was to remove all the overhead luggage racks, audiovisual consoles, wall carpet, flooring, ceiling materials, and finally the old water closet (bathroom).

As this progressed, we dropped every screw, nail, and rivet into a four-liter container and at the end of the demolition we were surprised as to how many fasteners we had removed. It was full. We also gutted and cleaned the bins (under storage), scraping off old paint, knocking out dents, and welding in a few patches after removing small areas of rust.

We were soon to find out that these old buses bred rust. In the engine bay, all the old soundproofing was removed and it came with 20 years plus of oil, dust, and dirt. You can just imagine how Sandra looked after this job. Being the smaller one she was able to fit into the engine bay to pull all the old insulation out.

After a good engine wash, new shiny insulation was installed, this not only soundproofed but heat-proofed the area above the engine (where the bed is) and we didn’t want to heat the bed up unnecessarily, not in Australia.

As mentioned, we concluded buses were de-signed to breed rust and this was particularly so in the areas which collected water spray from roads and dust, both of these settled on joints in the framework, disguising what was happening underneath.

Editor’s Note: When you buy a bus, always look underneath for rust damage. If there are holes in the metal, you will have to decide if it is worth patching the holes with new metal, or move on to another bus. This is generally determined by just how much rust there is. Small areas of rust are fine, but when structural members have too much rust, it may be best to look for another bus. For what else to look for when buying a used bus, read our Checklist for Buying a Used Coach on our Documents page here: https://www.buscon-versionmagazine.com/documents/

After a lot of labor-intensive scraping to get the caked on mud out, wire brushing the frame and joints, making any necessary repairs, they were all primed and painted with us knowing they were now good for another 20 years. By the time we finished gutting, repairing, and painting the inside, outside, and underside of the bus, we felt we knew the bus intimately.

The 30-year-old decor not only was dated but smelled, along with a lot of chewing gum which had to be scraped off. Once we had a bare shell, only the driver’s seat remained. The coach was ready to go to the body shop for some external re-sheeting, installation of new windows, the removal of the air-conditioning unit located on the roof and finally painting. We had also decided to raise the roof to give us more room inside and open up the space.

Body Repairs and roof raise.

Our biggest issue was the roof raise (prior to the internal build), which was beyond our control, we engaged a coach building company to do this as we didn’t have the equipment or space. This was scheduled to take about three months but little did we know our nice-looking coach was to become a money pit.

Oh, if only we had superman’s eyes, we would have known the roof air-conditioning had been leaking into the body frame and this over many years had rusted out the structural tubing from the inside out. We were notified that there was a lot of rust in the roof and all the roof metal framing would need to be replaced at a considerable cost.

This was only identified once the engineers had started to cut the frames to get ready to raise the roof and all the rust tinkled out from the inside. A decision had to be made, do we give our project away, selling the remains of the coach as scrap, or spend more money replacing the framework. At this point, the coach looked like an open-top tour bus.

It was decided to go ahead with the replacement of the sheet steel and at this point we decided to not replace the old heavy steel roof but put on a lighter fiberglass roof instead, saving weight. This took more time than expected and extended our build by approximately six months.

The decision was made to keep going ahead, it included new framing from the Z-bracing up, a rebuilt front end, new push-out windows and roof hatches including a single piece fiberglass roof, re-sheeting of the side panels, and a shiny new paint job. It was six months before we had our new motorhome back at the farm ready to begin the internal build.

At this point, it now had a name, THOR. Not because it was painted Kenworth Grey or because of the God of Thunder but because it has “Taken Heaps of Revenue”.

Conversion Stage

We were determined to steam ahead with the build as we had read about many of these projects stalling and never being completed. The first job was to scale out the inside space and draw up our floor plan on paper.

There were a number of criteria we wanted to meet. The master bedroom had to have enough room to walk around the sides of the bed. The toilet and shower were to be in separate rooms and the kitchen should have enough room that we are able to work and pass by each other without squeezing by.

Once we agreed on a plan, after a lot of erasing and redrawing we were ready to chalk the outline on the floor. This allowed us to mock up cardboard walls so we could see how our measurements would look once completed. After a few more tweaks the interior build commenced.

Not being conversant with any computer CAD (Computer Aided Design) programming and be-ing of a demographic that used scaled rulers with pencil and paper, we set out sketching our bus floor plan on paper.

Knowing how much space we had available, we then decided on what we needed in each space to ensure our maximum comfort. The bedroom, that was easy. We wanted a queen-size bed which could be walked around, making it easy to make the bed. Noting we were also not agreeable to climbing over each other every night to enter or exit the bed.

At the foot of the bed area was storage and this had to allow clothes hangers and shelving. This would also become the soundproofing and wall space separating the bathroom areas from the sleeping spaces. In addition, the space between the bed and wardrobe which are sliding doors had to allow sufficient room for dressing, this was achievable without sacrificing space from other parts of the build. Our bedroom design was complete, the masking tape went down on the floor to delineate this space.

We decided to have our toilet and shower separate. We designed a toilet area and shower with their own access doors. This part of the build was the only space that saw a few redesigns before settling on the final result. The redesigns were due to the space being too small, lighting, water flow and drainage inadequacy.

We wanted to minimize waste, particularly of water as this is a precious commodity when you have to carry it all. To improve lighting, we chose to have opaque doors on our toilet and shower meaning no artificial lighting is required during the day but privacy is still maintained.

The toilet was originally sideways to the door opening but this required more space for standing and sitting so it now faces the doorway, so as one stands, you have room before opening the door to exit. It was interesting that a building design came down to the ergonomics of how a space is used, even the toilet.

To delineate these spaces, we also incorporated a sliding cavity door. This allowed a person to be sleeping while not being disturbed by another person watching TV in front of the bus. The front area has an open-plan concept, incorporating the sitting and kitchen spaces. This area was designed to not only give serviceability, comfort, and openness but also balance to the build.

As mentioned before, the wet areas are in the center of the bus but are built on the offside so it balance the weight. The heavier storage areas like the pantry and fridge needed to be located on the opposite side.

Floor Leveling. Covering the passenger ramp.

The flooring required engineering at the front to level the floor as it sloped at the entrance to about the original 4th row of seating. This needed substantial framing and the construction of an additional step but once completed, it made all the flooring one level.

The extra step was not wasted as it allowed the installation of an additional under-bunk air conditioner/heater which along with a center air conditioner/heater is more than capable of cooling and heat the living space of the build.

The bedroom has its own air conditioner/heater under the bed. We only heat and cool the areas we are using as we can close off the spaces not needed.

The build starting at the rear with the installation of insulation in the master bedroom.

All of our planning was taped on the floor. First went in the plumbing and electrical. For a while there it looked more like an ER room with pipes and wiring going everywhere concluding at a proposed fuse box and water outlets.

All the power had to be separated with the 24 Volt and 240 Volt (Australian household power supply) being in its own color-coded conduit. We used the old footwell as our service area for all wiring as this ran through the center of the floor which was leveled as part of our roof raise.

Once all the power was concluded the build commenced, starting at the rear and finishing with the kitchen. All of the cabinetry was designed to not need internal framing but was self-supporting relying on each component. This also made for a quicker build and better use of space.

The interior build was so meticulously planned we didn’t run into any problems and really, we were quite proud of ourselves with the final finish. The bus was an original 12.5 meters (41 ft.) in length, by the time we finished, we were only 10mm (3/8”) out in our measurements and this was not an issue.

Floor Plans, wiring, and the start of the build.
The floor being marked up. Ready for shower cubicle and toilet installation.

The first to go in was all the new wiring - AC and DC. Next was the plumbing. There was no changing the floor plan now. As part of our planning, we had decided not to include any LPG appliances because in Australia the laws are quite strict and would result in cutting holes in the bodywork leaving openings for dust, rodents, and bugs. Once all power and water were installed, we were ready to build the cabinetry.

Starting at the rear we lined the rear wall and ceiling with marine plywood before building flat-pack cupboards which we had ordered from a kitchen supplier.

The queen-size bed was built using gas struts which allowed for storage under the bed after lifting the mattress. Under the bed, we store our less used items including winter clothing and the cover/awning for the motorhome.

Master bedroom.
Hallway from the bedroom looking forward.
Bathroom vanity.
Shower and sliding door.

Our floor plan allowed for a hallway along the side as we didn’t want to be able to view the bedroom from the front living space. This allowed us to concentrate the wet areas in the center of the coach which shortened water pipes for water and drainage.

We were able to include a full-sized shower cubicle and a separate water closet. The bathroom combination also provided a sound buffer from the front area to the bedroom as we also included a cavity sliding door separating the two spaces.

As the build progressed forward, our plan was coming to realization and we could see how the spaces were going to work. The kitchen area was designed to be open and airy therefore didn’t include overhead cupboards, we did however install sizeable pantries with slide-out shelving and a lot of easy access under bench cupboards. The countertops are spacious which allows two people to be using the kitchen at one time.

As mentioned, all of this cabinetry is floor to ceiling and self-supporting with no internal frames, each wall supports each other and is then screwed or glued to the floor, walls, or ceiling. This goes for all the cabinetry in our build. This design minimized wasted space needed for framework, and having traveled over 30,000 km (18,641 miles) it has shown no effects from movement.

The remainder of the kitchen consists of cupboards and drawers, visually it looks like any other domestic kitchen. We decided not to use handles for the doors, choosing to use what is referred to in Australia as “tip-ons”, which means all we do is push the door and they release and open. They rely on magnets to hold them closed.

However, the magnets were not always sufficient at holding the drawers closed during travel so we installed inside each cupboard and drawer a child lock sourced from the local hardware store, which physically locks all doors and drawers during travel preventing them from opening.

Once we conclude each day’s travel, we simply run a magnet over each door, which releases the lock. We can then lock them open until we travel next and our tip-on locks do the rest. The result is nice clean lines, no handles and especially no storage areas flying open whilst turning a corner.

We chose to have drawer fridges which once you mastered Tetris they worked very well and nothing was left to rot at the back as everything was visible each time they were open. They work very efficiently and took up very little space. Once again, the area is lit by natural lighting by including large push-out windows.

The sitting area includes a fold-out three-seater sofa which can double as a bed for visitors and two reclining captain’s chairs which are locked forward when traveling and double as dining chairs with a fold-down table in between.

View from the entrance towards the kitchen area.
View from the kitchen looking forward.

Flooring throughout the build is linoleum as it is easier to keep clean especially as we were traveling with pets. Our color palette is fairly neutral as it was decided to use furnishings to introduce color which included cushions and bedding. This has really worked for us especially if we wanted a change, we replaced cushion covers and bedding. Easy.

The captain’s chairs rotate to face forward for travel but become dining room chairs for mealtimes.

So how long did the internal build take? This was driven by more changes in our lives, Wes by this time decided to leave his job and spend all day on the build, we had also decided to sell the farm as it would be too hard to manage whilst traveling in Australia.

Sandra in the meantime had left her job and commenced a contract position full-time with the fire service which had a finish date roughly when we were due to start traveling. All approximately twelve months from the start of this adventure, to when we drove out of the farm gate for the last time.

Boarding a ferry with our trailer in tow.

Bus Life We

we're off on our “Big Lap of OZ” in THOR, we had no end date and Australia is a big place. Leaving in late 2016 to give us some direction, we decided to go to a caravan and motorhome rally in Canberra 800 km (497 miles) away, where we met some great people who gave us good advice. Some have remained friends after a number of years of motoring.

We have since traveled around Australia and up and down the East Coast a number of times and our motorhome has not let us down, traveling over 35,000 km (21,747 miles) so far.

Our planning has not had us wanting for anything in regards to living area or equipment, it really has worked well for us. It has ample space and storage, is easy to keep clean, has great natural light and good airflow.

One luxury is having all the storage area in the bins below which not only has fresh water, grey/black storage and solar batteries it allows us to keep the awnings for the side shade, T.V., satellite dishes, outdoor furniture, full-size washing machine, and a deep freezer.

The coach and trailer parked in the Australian Outback with a new matching paint job.
Awning on the side of the motorhome which gives us double the undercover space.
Bush camping in New South Wales.

What we would do differently next time?

There is really not much we would do differently if we were to undertake another build. We enjoy having the larger vehicle for the living space, storage capacity, and being able to see more as we travel much higher than a car.

Bus with the trailer.

Yes, having a large bus and trailer has limitations on where you can park, especially as we are 19M (60 feet) in length with the trailer.  We also have to watch out for low bridges and road weight limits but this is all part of the journey planning, we wouldn’t have wanted to travel Australia any other way.

We tend not to use caravan parks as they have very limited space or are not accessible. We prefer to stay at showgrounds or free camping in the bush.  One thing however we have replaced is the original inverter for the solar system.

When we did our original calculations of power consumption, we bought a system that would suit us but we found we had to constantly calculate what was on so as to not overload its capacity. We needed to turn off things to turn on something else.  What an unnecessary chore.  Now, we have installed a much larger system that has more capacity resulting in no more power juggling.

Bus life camping.
Camping in the green.

So, our advice for new builders is to look at what requirements you need and add a bit, having said that, it always comes down to affordability and budget. The original inverter was 3KW and we now have a 5KW inverter.

Our proposed next upgrade will be lithium batteries as they become cheaper in price, as they provide more amperage capacity and can be charged in much less time. We will replace ours when our lead-acid batteries start to lose capacity.

We don’t want for anything more.  The year is now 2021 and our touring has seen us visit incredible places of beauty in this vast country and we continue to do so today, albeit with COVID restrictions.

Bus tent set up. Note our bus cover includes the bus and the canopy.
Bus camping in the outback.

During COVID we have noticed a lot of people traveling within Australia as overseas travel is not permitted. We have noticed a lot more buses on the road and a lot of buses currently being converted, so the bus conversion fraternity in Australia is growing.

I hope you have enjoyed reading about our journey and if you are about to start yours, don’t get disheartened with hurdles. Look ahead, it will make you more resilient and ready to travel the two lanes of freedom.

Article written by Wes Young and Sandra Fawcett

Wes and Sandra are self-funded young retirees.  They have been traveling Australia in their coach conversion called THOR for five years, meeting great people and seeing beautiful sights.

Prior to their travels, they ran a small cattle property in the Adelaide Hills South Australia and both of them had off-farm jobs. Wes a diesel mechanic and Sandra a town planner with the local government, sold the farm and left their jobs to go and “live the dream”. 

They decided to do their travels early as they always say, “We want to see the view from the top of the hill, rather than wondering what it would look like.” During their travels we were accompanied by their rescue dog called Flynn who they commonly say, “he is an Australian X,” as they don’t know his breed.

Due to COVID restrictions, they needed a new base, and now call Bungadoo, Queensland home, and base.

You can follow Wes and Sandra on Facebook at Thor Thorsa

You may email Wes at WesYoungFvee@hotmail.com 

Click HERE to read other articles by this Author
To be the first to read all new articles and to read thousands of articles about conversions back to 1992, become a member of BCM.
Click HERE to become a Member now!

You may also like

chevron-rightcross-circle