Miles, the Bus – A 28’ 2005 Freightliner/Thomas FS-65
I started looking for a mid-sized bus (30-ish ft), and it became apparent that that size is somewhat rare.
I had looked at a few very nice Bluebird 84-passenger rear-engine buses in the Eugene, Oregon area. And though I really liked them and would have loved the interior space, I realized I didn’t want to try to squeeze something that long into parking lots and campsites. I also knew I didn’t want a tiny bus, so I started looking for a mid-sized one (30-ish ft). It became apparent that that size is somewhat rare.
I found two identical mid-sized buses from the Etowah County, Alabama, school district on a GovDeals.com auction in August of 2017. I had never participated in an online auction and was a bit apprehensive, but I decided to bid on one. The auction was slated to last a week, and I had read that the real “action” all happens in the last few minutes. Yes, it certainly does, and it was all down to just one other guy at the end, and me. When he bid $6,000, I said, “Ok, it’s yours.”
I thought, “Oh well, that was my first auction, there’ll be another,” when I remembered the other bus, just like the one I’d lost. I wondered what the other one sold for, so I went over to that other auction, and there were 15 minutes left! At that point, the bids weren’t even close to six grand, so I jumped in, and after some back-and-forth bidding, I won that bus for $5,600. Whew! That was exhilarating.
That’s when it hit me: I now own a school bus in Attalla, Alabama. That’s like a million miles away from Bellingham, Washington, where I live. The auction rules stated that I had to pay for it at the school district office and take possession within five days. It was 9:30 on a Thursday morning. The office would close on Friday at 5:00, and wouldn’t re-open until Monday morning. I had a one-week break between finishing one job and starting the next.
My wife had quipped before she left for work that morning, “You’re not going to take off to get a bus before I get home, now, are you?” I replied, “No, sweetie, I won’t do THAT”. But that’s EXACTLY what I did!
By noon, I had gotten a cashier’s check from the bank, a one-way ticket to Birmingham, Alabama, and had booked a 1:10 am departure on the shuttle bus to Sea-Tac airport. I texted her from the shuttle, “I’m on my way to Alabama, see you in about five or six days. I love you.”
After a red-eye flight and a crazy Uber ride, I was at the Etowah County bus yard in Gadsden on Friday morning. A quick meet-and-greet with the lot supervisor got me the keys, and the question “Have you ever driven a truck with air brakes? “Of course,” I lied. Then I climbed into that bus and drove it 2,900 miles back home to Bellingham, WA.
People have asked me, “How did I know the bus would make it all the way home?” Frankly, I didn’t. Though the worn-out seat beat me like I was riding in an old hay wagon, it ran the entire way home without so much as a hiccup.
I’m semi-retired and only have a lot of work in the summer, but that summer’s work carried into the fall. So, with the Pacific Northwest cold weather and rain in full swing, I began the conversion process by removing the seats and wheelchair lift, then removing the rubber flooring and plywood subfloor to examine the floor for rust. Fortunately, there was only a bit of surface rust on the floor in the back corners and around the wheel wells, no rust-through anywhere. THIS is why I wanted a southern bus.
After that, I removed the two large air-conditioning evaporator units on the ceiling, the condenser units under the floor, the wiring and refrigerant lines, and also the two compressors, idlers, and engine brackets. That necessitated replacing the serpentine belt with a shorter one. The A/C was ineffective and noisy by then, and I wanted the headroom, so it had to go.
Finally, I removed the interior skin from the walls and ceiling. Pro tip: Place a couple of boards across the width of the bus in the windows to help hold the ceiling panels as you remove the screws. If you have rivets, well... brush up on your cuss words, you’re gonna need them.

Ceiling removal showing boards holding up panels.
The next step was to wire-brush the rusty steel, clean up the dust it created, then treat the metal with a phosphoric acid rust converter, fill all the seat bolt holes, and paint the floor with a good solvent-based metal primer.
The following spring, I had to tear off and rebuild one side of my house, so I didn’t get to the bus project until mid-July. I decided to do the body modifications and paint the bus while the weather was favorable.
I lengthened the lower body skirts to match the bottom edge of the battery box and accessory/tool box, so my tanks wouldn’t show from the sides, skinned the rear and wheelchair lift opening, deleted the side windows I didn’t want, skinned over one emergency escape hatch, and put a skylight in place of the other.

Windows removed, doors skinned, body skirts extended.
A local sheet metal shop bent some 16-gauge mild steel into shallow pans for the window deletes and the skirt extensions, and cut the panels to size for the door skins. I coated both sides of all pieces with epoxy primer before installing them.
I’ve repaired and repainted a few cars in the past, so I have some experience with automotive painting. However, I had never refinished a vehicle of this size, though, and found the overall scope of the work daunting. Cleaning, sanding, removing gooey decals and the DOT conspicuity tape, silicone sealant (ugh, absolute poison for auto refinishing), and masking for priming and top coating took several days.
I then primed the entire bus with epoxy primer and top-coated it with single-stage automotive urethane in four colors: main body, Deep Aqua; accents, Light Aqua; wheels, grille, bumpers, and mirrors, Dark Pewter; roof, White. The paint came from an online supplier, TCP Global. It was about half the cost of the same products from PPG or DuPont at my local auto body shop.

Bus in epoxy primer.
To complete the paint job, I refinished the mirrors and grille, replaced all the marker and tail lights, and repurposed the student loading warning flashers as front and rear floodlights.

Paint job with racing stripes, accents, wheels, bumpers, and roof in four colors; Mirrors, horns, and solar rack installed.
With the exterior finished, I turned my attention to the solar installation. I wanted this bus to be entirely capable of off-grid operation.
While it may seem that the various aspects of this build were separate, discrete endeavors, they actually overlap considerably in time. I spent over a year researching off-grid solar design, equipment, and methods to develop a system that provides adequate power for continuous off-grid living.
Using electricity for any heating (space heating, water heating, and cooking) consumes a large amount of power. Of course, that’s why most RV manufacturers use propane appliances. LP gas equipment specifically designed for RV use already exists, so there is no need to reinvent the wheel there.
With heating functions accomplished by propane appliances, the electrical loads are relatively minimal. I decided to use 12V DC devices whenever possible. That’s lighting, furnace fan and controls, water pump, refrigeration, ventilation, device charging, and entertainment.
In a nutshell, my solar power design process followed these steps:
- Determine the power consumption of each device, and decide the daily run time of each one. Some of those figures are provided in Amps, others in Watts. Convert all power usage into total watt-hours per day.
- Add all the daily uses together to get the total watt-hours consumed per 24-hour period.
- That’s how much power the battery bank will need to be able to provide each day. Convert the battery bank's amp-hour capacity to watt-hours as well; capacity varies by battery chemistry.
- That’s also how much power will need to be generated each day by the solar charging system.
- Select charging equipment that will deliver that power to the batteries from the daylight received.
These steps are simplified, of course. A bit of figuring goes into each one, but nothing more than Ohm's Law P = E × I (where P is Power in Watts, V is Volts, A is Amps), is necessary. The solar installation occurred in two stages: Stage One, before insulation: building the roof rack, attaching the solar panels, affixing and sealing the combiner box, and running the wiring in the interior; and Stage Two, post-insulation: configuring the controls, monitoring equipment, and battery bank.
Stage One
The rooftop solar rack was built from 2” x 2” x ¼” aluminum angle, through-bolted to the body ribs with stainless steel bolts, and the nuts were welded to the ribs on the underside, allowing the rack to be removed and replaced for repairs without disturbing the interior ceiling.
 panels, all connected in parallel to minimize the effects of partial shading")
Six 180-watt 36-cell 12V panels, all connected in parallel to minimize the effects of partial shading.
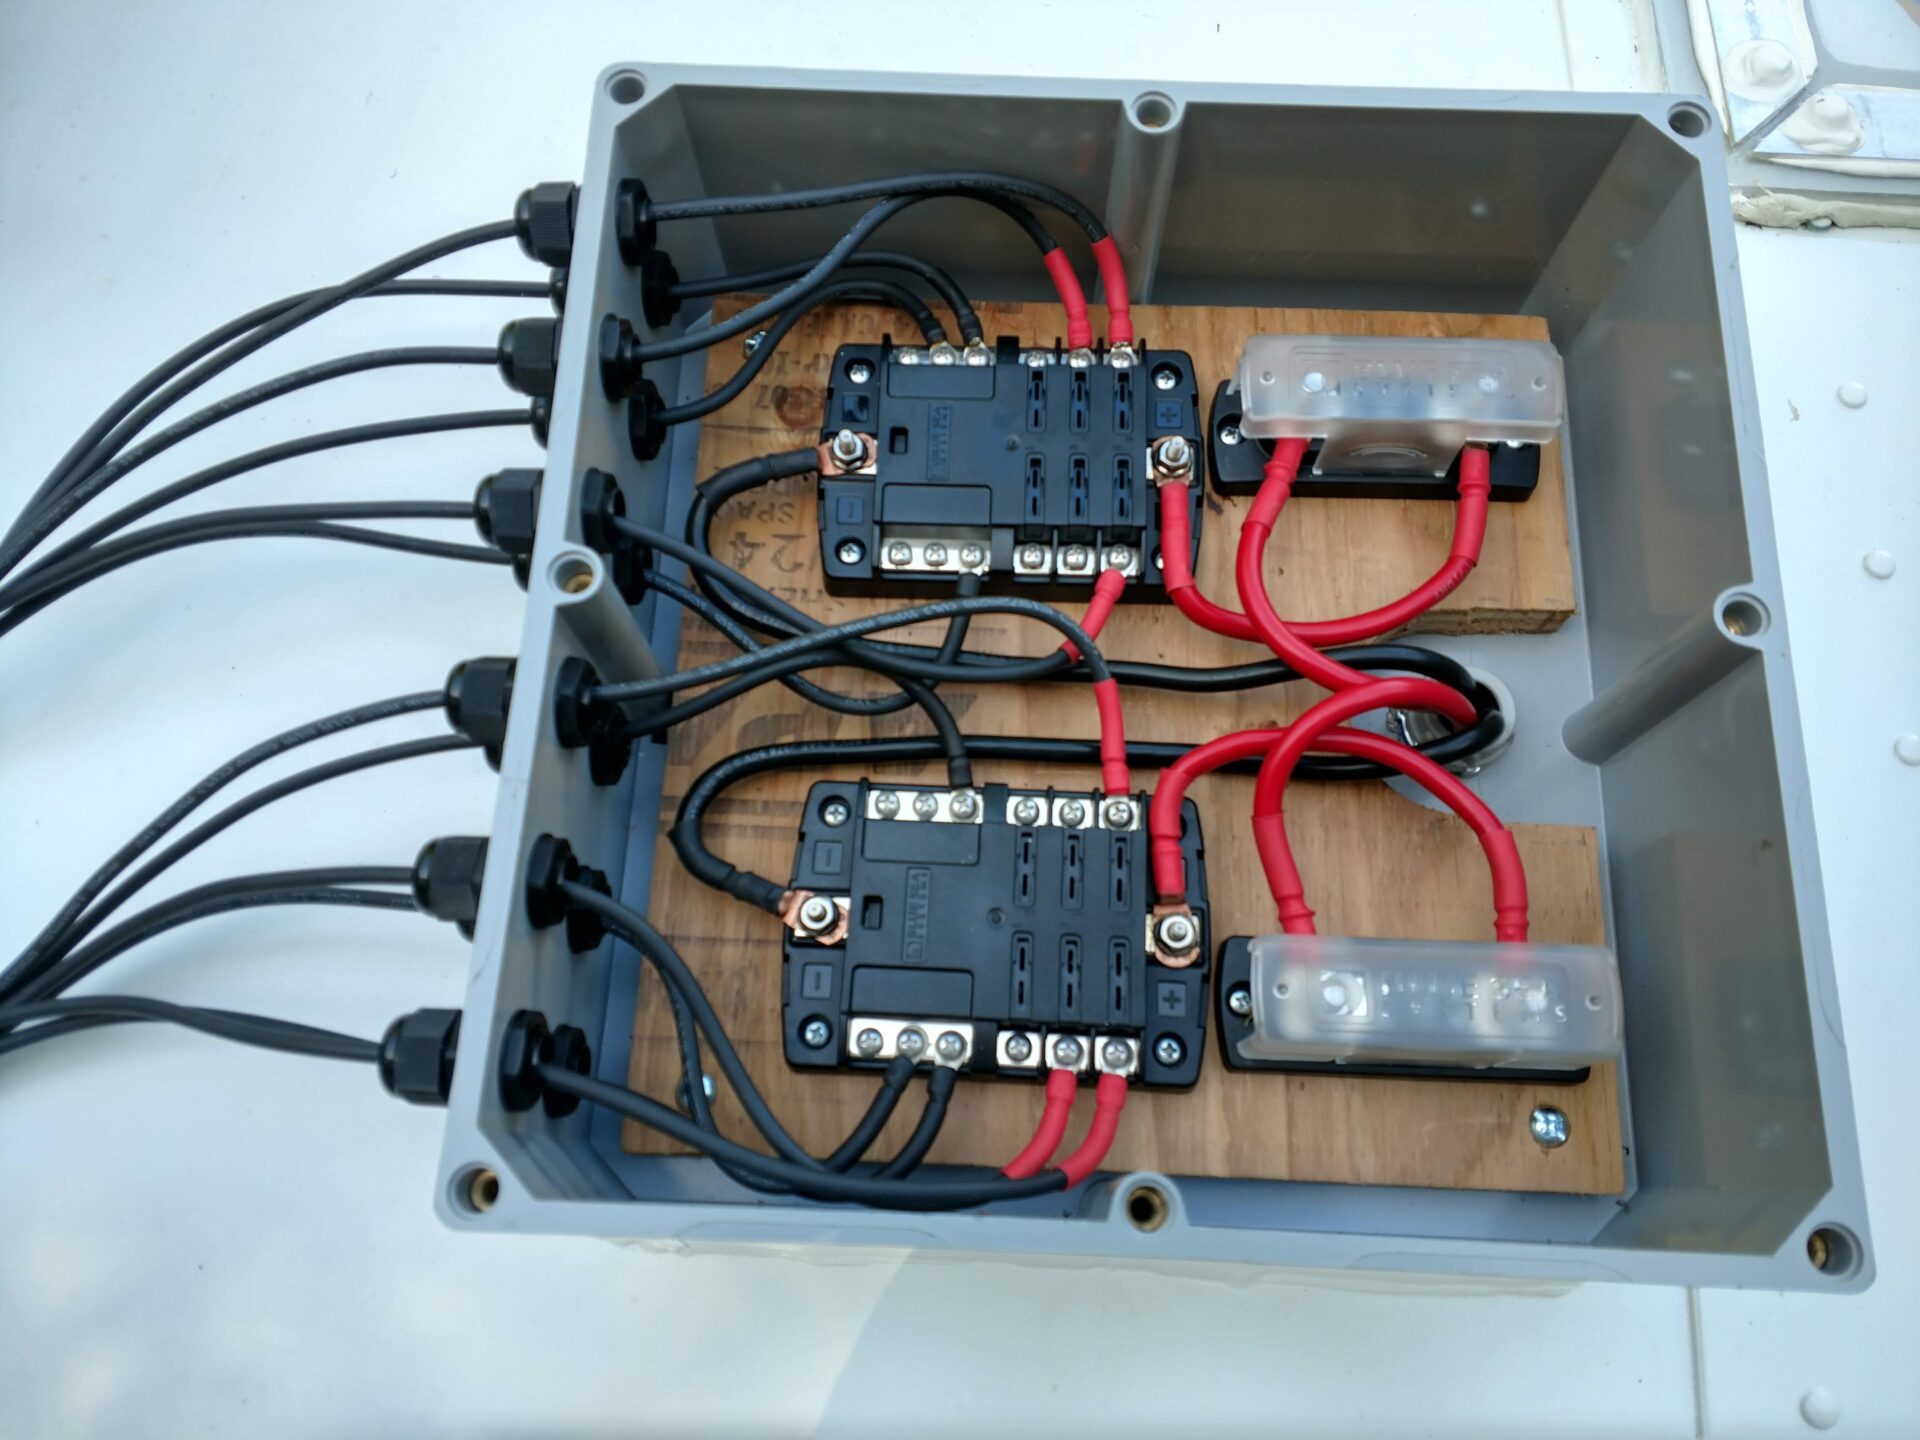
Rooftop box combines the output of the six panels into two feeds, which go to two charge controllers, each having a 31-amp capacity.
I’ll return to completing the solar power system after some progress on the build. Next, insulation!
Stage Two
I insulated the bus with a combination of spray foam and XPS foam board insulation. The early spring weather was too cold to spray foam without thoroughly warming the bus. To accomplish this, I put every insulating item I had on top of the bus, including rolled fiberglass, moving blankets, old sleeping bags, whatever, and a covering of Visqueen plastic to hold it on and keep it dry.
Then I put three electric heaters – about 4500 watts - into the bus, with a fan to blow the hot air around. I let that run all night. The next morning, when I went out with my laser thermometer, the roof skin measured 108 degrees. I had been keeping the spray foam kit, using Foam It Green, which covers 600 board feet, in the house to keep it warm. I opened the bus door to let it cool a bit, and when the steel got down to 80 degrees F, the spraying began.
The curved roof and as many wall cavities as the kit would cover were foamed, then trimmed to the depth of the ribs. The remaining wall cavities received 2” foam board (pink or blue board, doesn’t matter, they’re the same). I created curved furring strips for the roof by laminating two layers of ½” plywood to the ribs, using Tek screws and Liquid Nails to secure it. I made the strips about four inches wide to allow the finished ceiling boards to be attached off-center to the ribs, creating a thermal break.
1” thick Mylar-foil-faced flexible Styrofoam boards were added to the curved ceiling between the furring strips, and the seams were sealed with aluminum tape to create a vapor barrier.

Ceiling insulation complete with thermal break and vapor barrier.
The seat rails projected an inch, so 1” thick furring strips were added to the walls. 1” XPS boards were cut to fit between them, and finally, 1” XPS boards were glued to the steel floor using Loctite foam-friendly glue, an entire tube per sheet—the result: 3” foam on walls and ceiling, for R-20; and R-6 on the floor. We’ve managed to stay cozy through 15-degree windy nights and have never had a frozen pipe.
Finishing the Bus
The finished ceiling was put up next: 1” x 6” T&G (tongue-and-groove pine), fastened to the furring strips with stainless-steel oval-head screws and cup washers. The walls were then covered with a layer of ½” plywood.
The cabinet construction came next, starting with ¾” T&G plywood on the floor, glued to the foam board with copious amounts of foam-friendly glue.
Next came two closets built on top of the rear wheel wells, and the main bulkhead dividing the front kitchen/living room area from the rear bed/bath area. The placement of the wheel wells couldn’t have been in a more perfect place for this design; indeed, they dictated the layout.
There are no hollow walls in this bus. The construction is like a big cabinet job, all ¾” plywood, fastened with 2” x 2” cleats and many, many Kreg Jig pocket screws. The plywood is clad where it shows, with thin pine and cedar tongue-and-groove paneling.
The cabinets were assembled in place from sub-components built in my shop/garage. I made face frames and doors from pine, using a biscuit joiner and a Kreg Jig. After assembling the parts in the bus to ensure everything fit together, I disassembled the subcomponents, sanded them, and finished them in the shop. I stained the doors blue with General Finishes water-based stain, and gave everything three coats of polyurethane. I made the kitchen counter from a double layer of ¾” plywood and covered it with a cool retro “boomerang” laminate.

Kitchen sink cabinet and fridge face frames.

Countertop ready to install.
Next, we’ll look at the plumbing, both the water and gas systems. I ran the water piping in PEX, all inside the insulation envelope, and the gas piping in black iron, all under the floor.
There are two 42-gallon polyethylene freshwater tanks, set on their narrow sides and tightly boxed in under the bed, that feed a Shurflo 3 GPM pump. The tanks are plumbed together and function as one baffled 84-gallon tank.
There are only two water-using fixtures in the bus: a shower and the kitchen sink. The water heater resides in the “dead corner” of the kitchen lower cabinet. It’s a simple 6-gallon standing pilot model from Suburban. Accompanying it are a pair of 2-gallon bladder tanks: one is a well pressure tank as an accumulator, the other is an expansion tank for the water heater.
Why a water heater expansion tank? I incorporated a hot water recirculation system into the plumbing design, which conserves water by recirculating hot water to the shower mixing valve without running any down the drain. Check valves and a tiny auxiliary pump were used to achieve this, creating a closed water-heater loop that required an expansion tank. This will help to extend our boondocking stays.
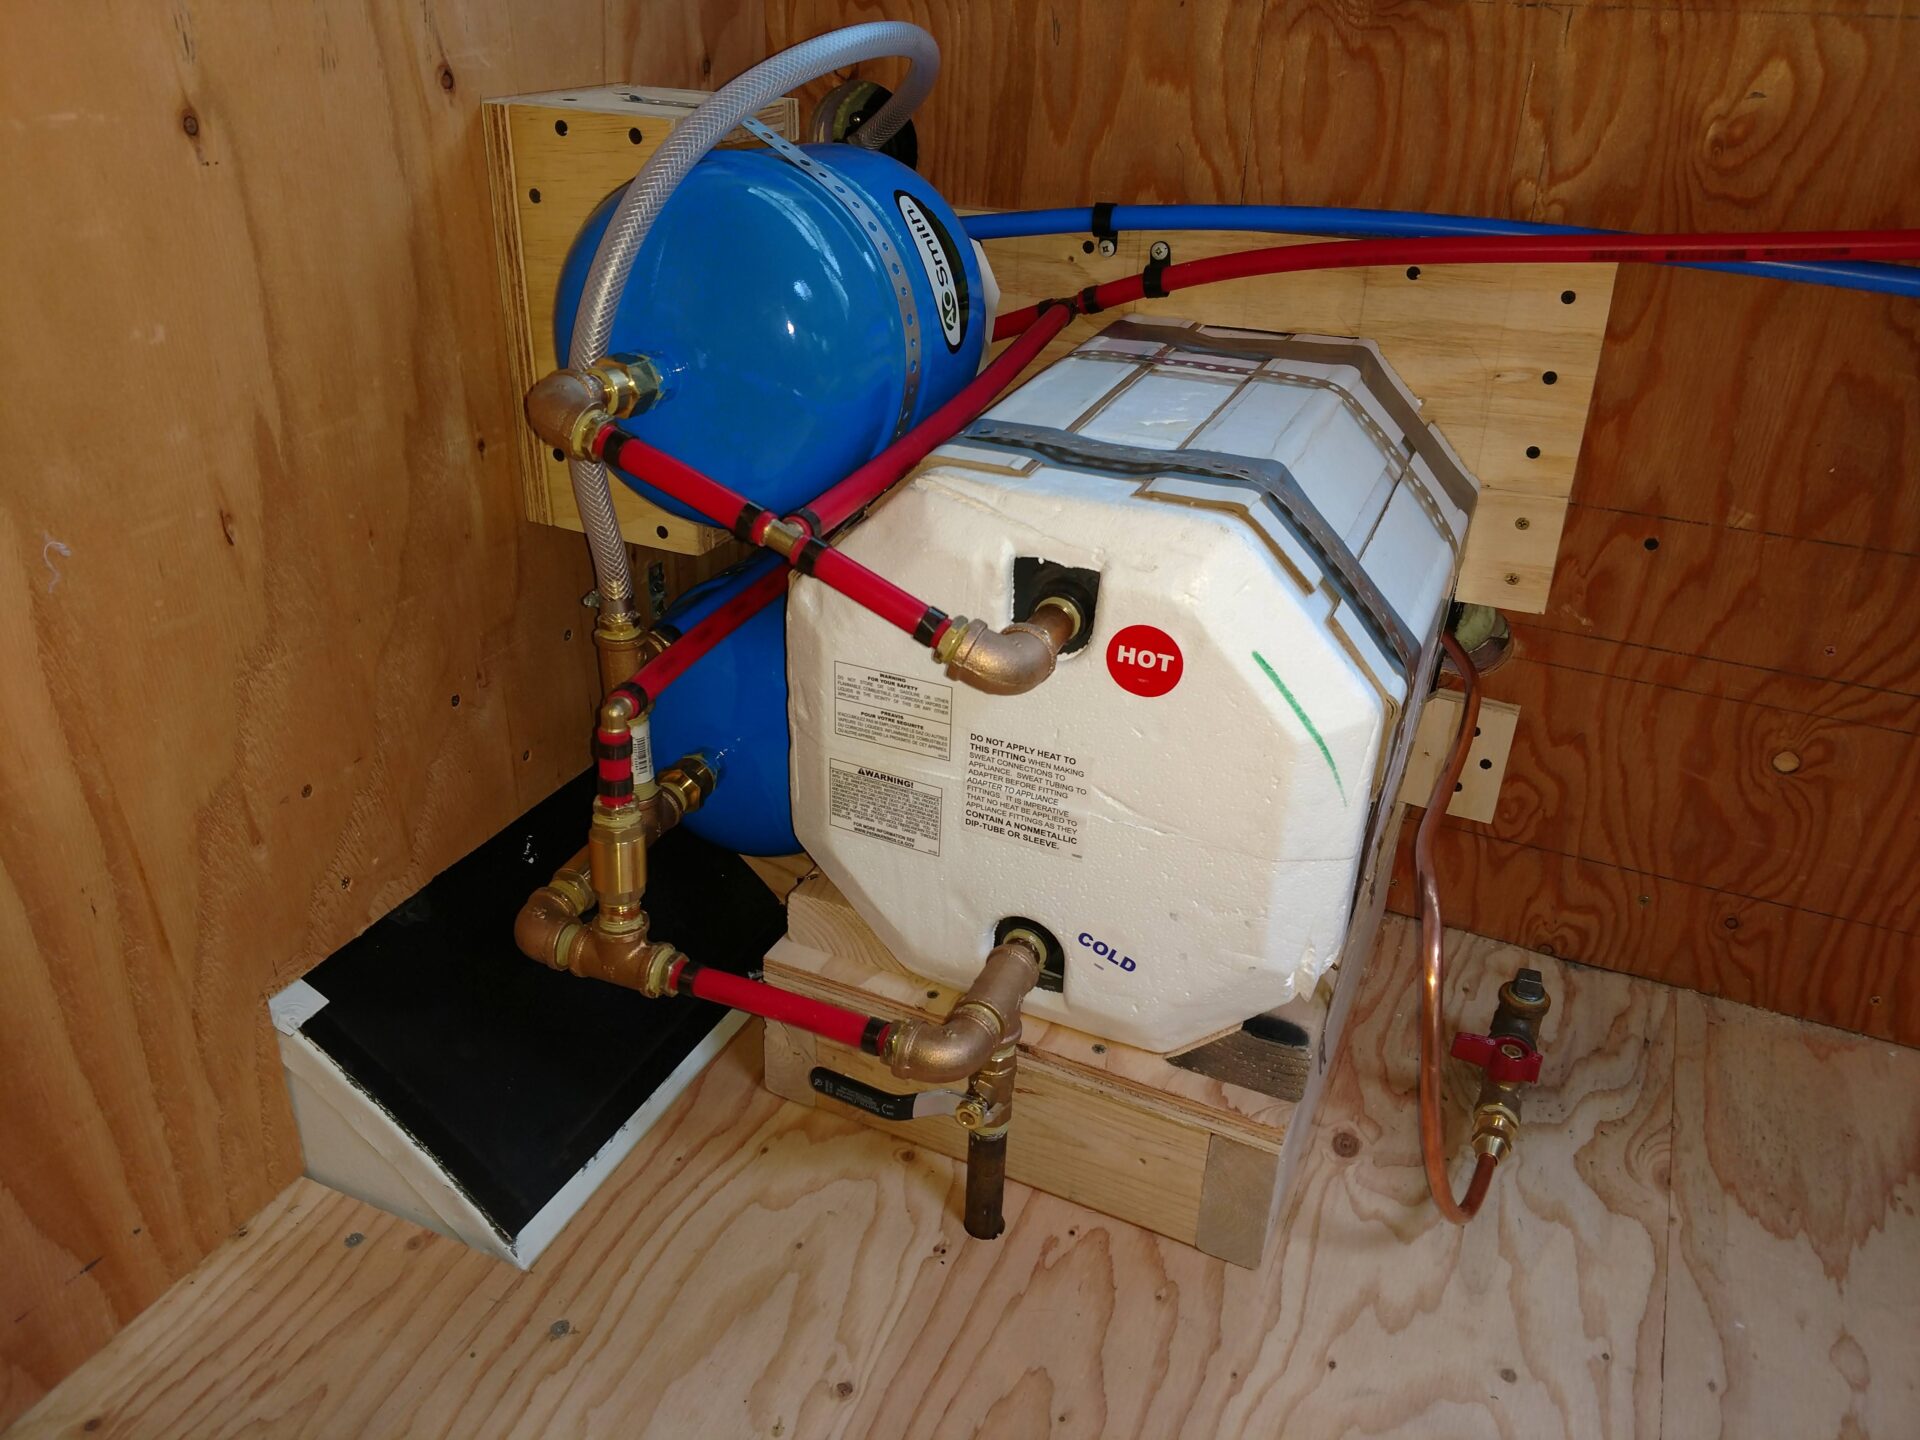
Six-gallon water heater with system accumulator and expansion tank.
The LP gas tank is mounted under the floor on the curb side, just aft of the stepwell. It is a 29-gallon horizontal tank from Armebe. Black ½” steel pipe runs under the bus, stubbed up through the floor to serve each use: the furnace, a Suburban 16k BTU unit; a three-burner Suburban cooktop; and the aforementioned water heater. Each appliance has its own gas shutoff valve. I conducted a pressure test on the system at 30 PSI. Once it had held for one hour, I ended the test.
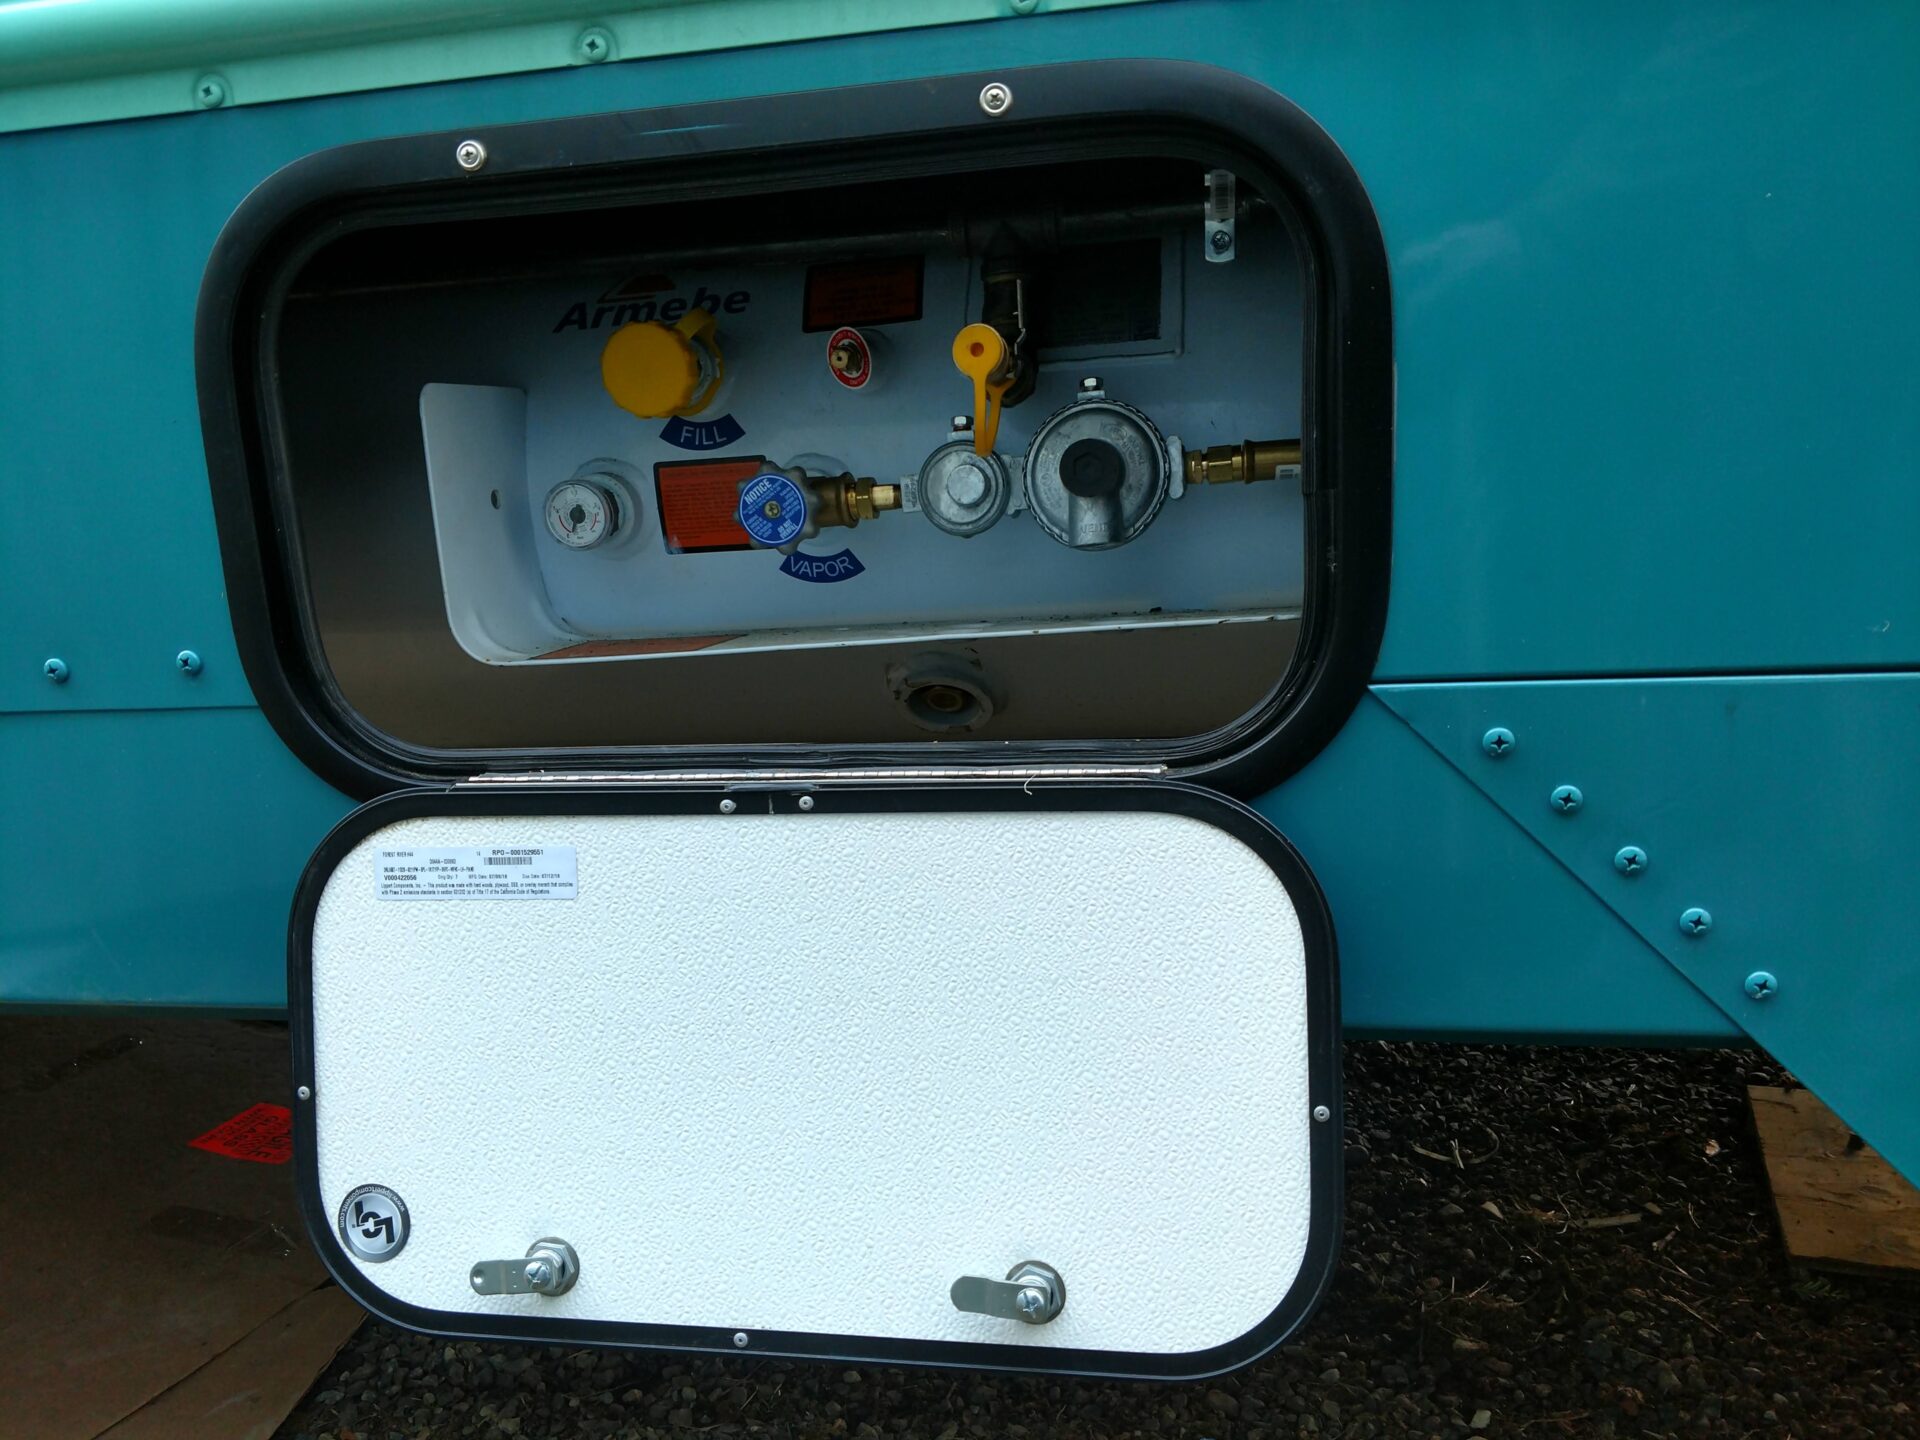
29-gallon LP tank viewed through access door.
There is no black water tank. We use an AirHead composting toilet when no other option exists, though most of the time, where we go camping, there’s at least a vault toilet nearby. I installed two 31-gallon gray water tanks: one in front of the axle for the sink and one behind the axle for the shower. They are supported by a framework made of 2” x 2” x ¼” steel angle iron. Both tanks have a standard 3” RV dump valve for emptying.
The drain plumbing is run in a 1-½” ABS pipe; Hepvo traps are employed to save space for the shower drain and to prevent freezing. Only one vent was needed, and it serves the Airhead toilet as well. The vent pipes meet in the driver’s side closet and exit through the roof.
Now we’ll return to the control and storage elements of the solar system.
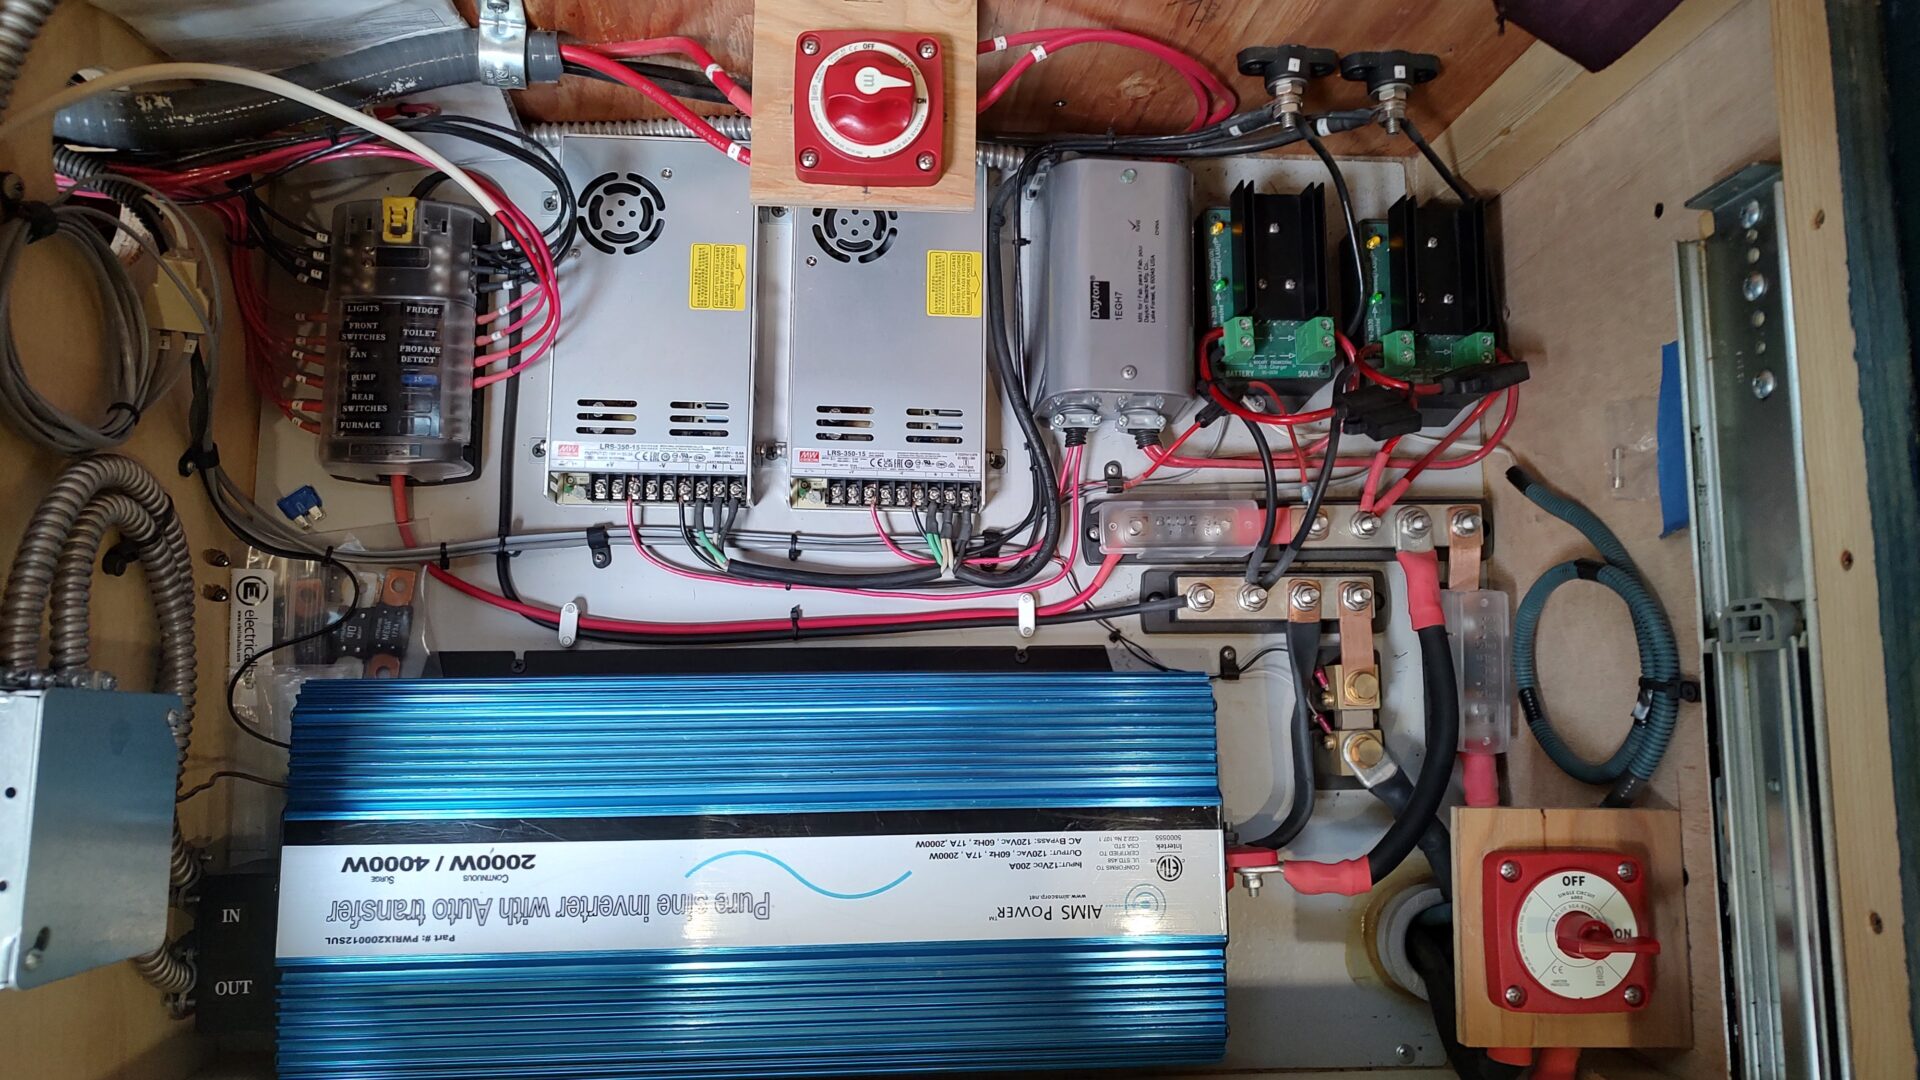
House electrical control compartment.
The house electrical control compartment is situated under one-half of the pull-out couch. In the upper-right corner are the two charge controllers by Bogart Engineering, SC-2030. To their left is a gray box containing a double-pole/double-throw relay that automatically switches battery charging from solar to shore power when shore power is connected at 120 VAC. Further left are two silver-colored Mean Well AC-DC power supplies, each 350 watts, that charge the battery bank through the charge controllers when connected to 120V, 30A shore power.
In the top-left corner is the house 12VDC distribution fuse block from Blue Sea Systems. The lower left is the AIMS 2000-watt inverter/shore power transfer switch. The large red switch at the top switches the solar feeds; the one at lower right switches the battery bank connection.
Also pictured is the “brain” of the system: a 500 amp/50 mV shunt, which communicates with a Bogart Engineering TM-2030 Trimetric system monitor, regulating the operation of the charge controllers, fuse blocks, and bus bars, all from Blue Sea Systems.
While all the systems in this bus conversion work well, I’ve been particularly pleased with the performance of this solar electric system. It has provided plenty of reliable power for six years so far. Most days, the battery bank is back to 100% by 1:00 pm.
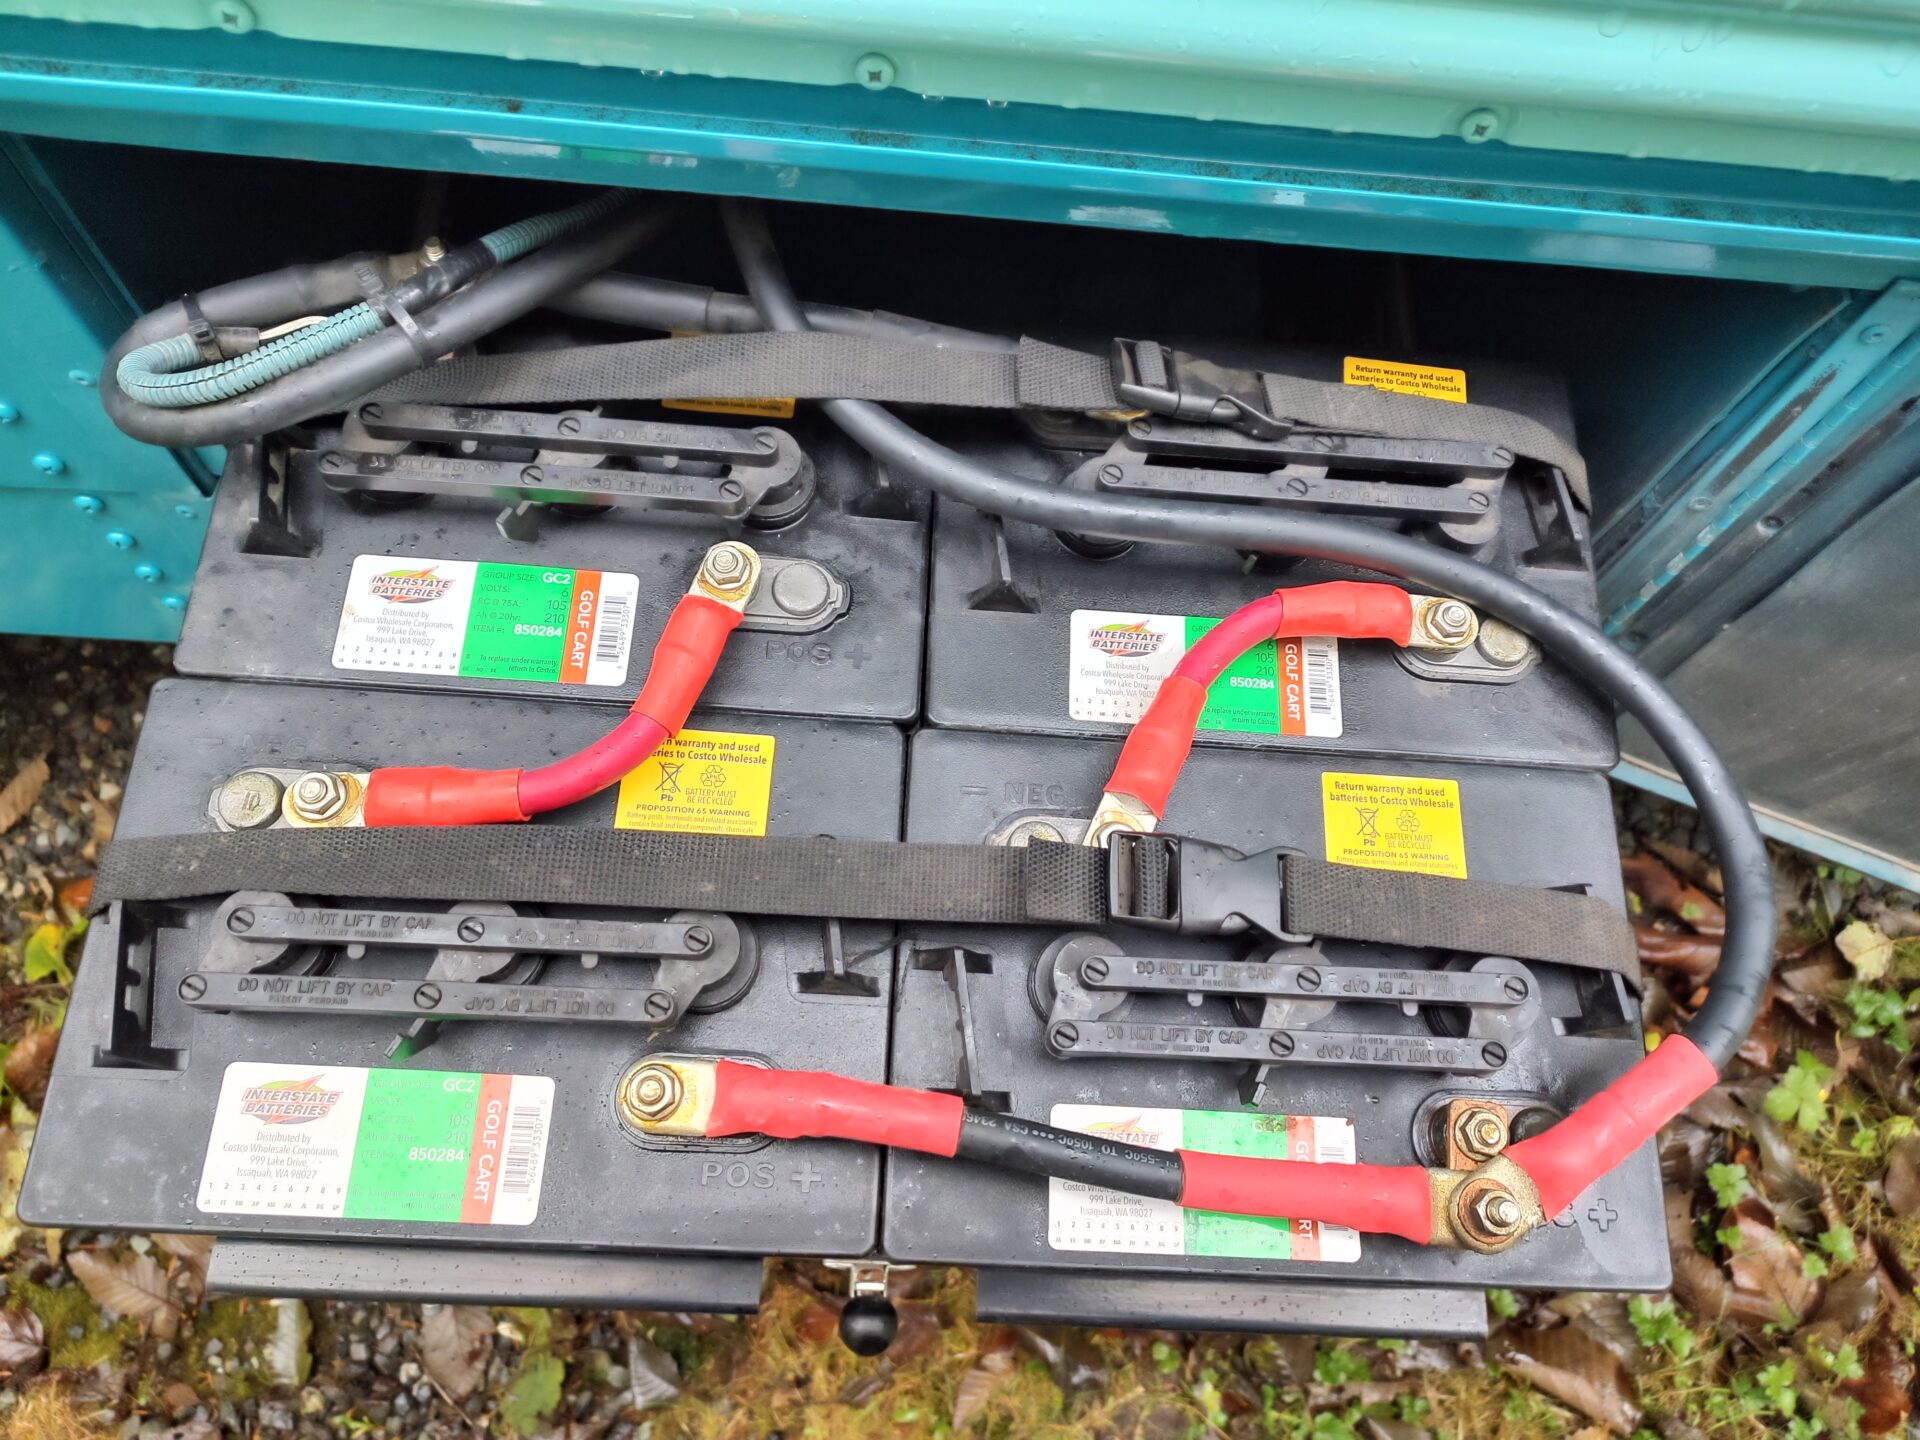
House batteries in a slide-out tray. The tray had a wimpy latch, so I added two slide bolts.
The battery bank comprises four 6V FLA (flooded lead-acid) deep-cycle batteries from Costco. They rest in a slide-out tray from MoRyde, housed in a storage/tool box beneath the bus floor, directly below the solar electrical control compartment.
The battery compartment is vented, and the control section is sealed against battery fumes. The batteries are connected in a series-parallel configuration for a 12V bank. I chose FLA batteries for simplicity, reliability, and cost. Their weight was not a concern with this bus.
I’m a jazz drummer, so of course I had to give this bus a jazz name, so Miles it was, since I didn’t want to explain Thelonious repeatedly. (IYKYK) But it very well could’ve been named Serendipity, for all the lucky breaks that have occurred.
Here’s one: I wanted to put the shower in the back-left corner of the bus, but the exhaust pipe ran right through the area where I needed to place the wastewater tank. I was lying underneath the bus, wondering how I could re-route the exhaust, when I thought maybe I could flip it over behind the rear axle and run it out the back on the other side. The pipe separated easily at a clamp (so grateful to have a rust-free bus!), and every piece fit right back together as if it were a mirror image.
There were already holes in the frame rail on the other side to mount the hangers. I flipped the rear bumper over and bolted it directly to the same holes on the frame, and the pipe now exits through the same hole in the bumper, just on the right side. I was even able to reuse the clamps and bolts!

Bumper flipped over and exhaust on right side, tow hitch, rear flood lights, sewer hose storage tube.
Miles, the bus, has been a stalwart friend. He’s taken us on many local and regional camping trips in the Pacific Northwest, and snowbirding in the Southwest a few times. The winter 2026 trip will be a “bucket list” item. He’ll take us through Southern California, Arizona, New Mexico, Oklahoma, Texas, and down to New Orleans. We’ll visit family and friends in North Carolina, Tennessee, Ohio, and Illinois on the way back home to Bellingham, Washington.
Hope to see some of you along the way. Honk if you see us on the road!
Here are some random photos of the bus.
. Perfect for us, neither Marcia nor myself are large people")


| Specifications | |
|---|---|
| General | |
| Manufacturer | Freightliner/Thomas |
| Model | FS-65 |
| Year | 2005 |
| Vehicle Weight | 27,500 lbs. GVWR: 18,980 lbs. scale weight with full fuel and water |
| Fuel Tank Capacity | 60 gallons |
| Miles Per Gallon | 9-10 towing the car; 12-14 without |
| Engine | MBE 906 6.4 liter turbocharged inline six diesel |
| Transmission | Allison 2000 5-speed overdrive |
| Overall Length | 28 ft. |
| Overall Width | 8 ft. |
| Overall Height | 10 ft. |
| Raised Roof | None |
| Solar Power | 1.08 kW |
| House Batteries | Four 6V FLA deep-cycle lead acid |
| Electrical System | 12V and 120V |
| Inverter | AIMS 2000W |
| Shore Power | 30A |
| External Equipment | |
| Fresh Water Tank Capacity | 84 Gallons |
| Grey Water Tank Capacity | 64 Gallons |
| Tank Material | Fiberglass, Polyethylene, and Stainless Steel |
| Water Heater | Gas |
| Internal Equipment | |
| Stove | 3-Burner |
| Oven | None |
| Microwave | Yes |
| Convection Oven | No |
| Refrigerator | Electric Only – 12V DC |
| Shower 20” x 30“ | |
| Toilet | Compost AirHead |
| Air Conditioning | None |
| Propane Furnaces | One 16,000 BTU |
| Electric Heater | One 1500W |
| Wall Material | Wood |
| Ceiling Material | Wood |
| Flooring Material | Wood |
| Roof Ventilation | 12V Fans Maxx Air |
| Fuel | Gas, Diesel, and Propane |
| TV | None |
| VCR | None |
| DVR | None |
| Blu-ray | None |
| Satellite | None |
| Bed Size | 48 x 75 (¾ Full Size) |
| Wire Type Used | THHN Stranded Copper |
| Propane Tank | 29.3 Gallon Stationary |
| Water System | |
| Water Pump | Shurflo 3 GPM |
| Plumbing Material | Copper and PEX |
| Interior | |
| Insulation | Spray foam & XPS foamboard |
| Type of wood used for walls and cabinets | Pine and Cedar |
| Counter Top Material | Formica |
| Kitchen Appliances | |
| 3-burner cooktop, 4.6 cu ft Undercounter Refrigerator, Microwave | |
| Window Coverings | None Yet |
| Lighting Type | LED |
| Sound System | Jensen Car Stereo with two Speakers |
| Notable Features | Hot-water recirculation system for the shower. |
| In Conclusion | |
| How long have you owned your bus? | 8 Years |
| Did you self-convert? | Yes |
| How long did it take? | 8 Years |
| What inspired you to do a bus conversion? | Didn’t want another leaky, moldy “Sticks-N-Staples” factory-built, mass-produced RV. |
| What would you do differently next time with Electric/Gas/Propane, if any? | Nothing. It is just the way we like it. |
A transplant from the Midwest, Ross Osborne has been a mechanic and builder for the last 50+ years, eventually retiring from his appliance repair business.
Ross has always loved music, and jazz in particular. He played trumpet, baritone, and tuba in school, and after a long break, he decided to learn to play drums at age 55. He plays in a local band with his wife, Marcia, who plays piano and also sings in a couple of other groups, and at Unity Church, where she is the music director.
After seeing a couple of "Skoolies", Ross said, "I could build one of those".
Ross and Marcia live in Bellingham, Washington, with their dog, Jerry.
to open the company's website.