


No products in the cart.
Richard Gastmeier
February 15, 2025
64 views
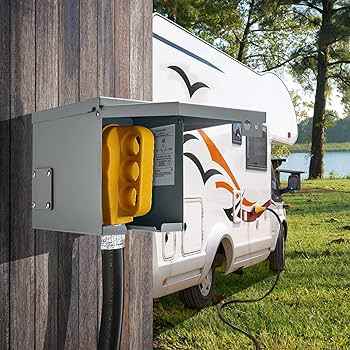
Shore Power Hookups for RVs: A Comprehensive Guide
Understanding your electrical hookups is not just important; it's crucial for a comfortable, hassle-free, and safe experience when you’re hitting the road with your RV, bus, truck, trailer, or van conversion. This article will dive into the common amperage ratings of typical RV connections, the reasons behind each, plug configurations, how campground hookups vary, and how to install an RV receptacle at your home to power your RV while in your driveway. This knowledge will keep you informed and safe and help you understand your RV's electrical needs.
Common Amperage Ratings and Understanding Electrical Hookups
A comprehensive understanding of electrical hookups is essential when owning an RV. Different RVs have different power needs, and understanding these needs will ensure you have a smooth, enjoyable, and safe trip. Let's explore the common electrical amperage ratings, the reasons behind each, and RV plug configurations.
30 Amp Service: The Middle Ground
The 30-amp service is a practical and convenient choice for smaller to mid-sized RVs and travel trailers. This setup, commonly found in such RVs, can deliver up to 3,600 watts of power (30 Amps multiplied by 120 volts), which is usually sufficient to run essential appliances such as one air conditioner, a microwave, and a television simultaneously.
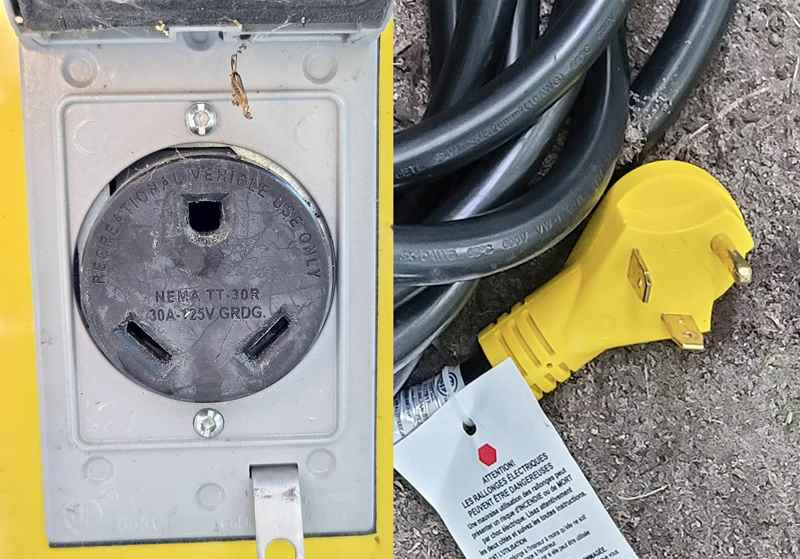
- Plug Configuration: The 30 Amp plug is designed with three prongs – a flat prong for the neutral wire, a round prong for the ground wire, and another flat prong for the hot wire. Each prong serves a specific function in the alternating current electrical hookup.
- Usage Reason: This amperage is ideal for RVs with fewer power demands. It’s designed to support several electrical devices and is sufficient for most camping scenarios.
Why Choose 30 Amps?
- Versatility: Many national parks and older campgrounds only have 30 Amp service available, making it a practical choice for various camping destinations.
- Ease of Use: Setting up a 30 Amp service is straightforward, and the plugs and outlets are widely available and easy to connect.
- Cost-Effective: Generally, smaller RVs designed for 30 Amp service are less expensive than their 50 Amp counterparts in terms of initial purchase and maintenance. A few years ago, most RVs were smaller, had fewer electrical appliances, required less power, and got by fine on 30 Amps.
50 Amp Service: Powerhouse Performance
Larger RVs and motorhomes often require a 50 Amp service. This configuration provides significantly more power, accommodating high-demand appliances and multiple devices operating simultaneously. A 50 Amp service can supply up to 12,000 watts of power with two separate 50 Amp circuits.
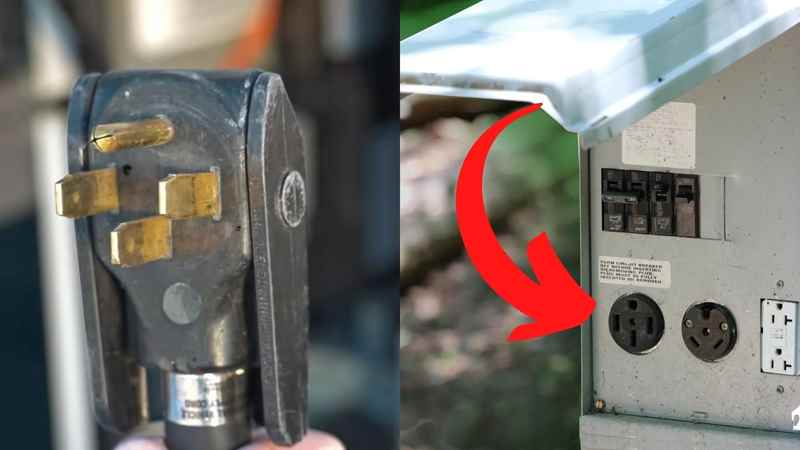
- Plug Configuration: The 50-amp plug features four prongs: two flat prongs for two hot wires, one flat prong for the neutral wire, and one round prong for the ground wire.
- Usage Reason: The 50-amp service is necessary for larger RVs with substantial electrical demands. It allows the use of multiple high-wattage appliances, such as air conditioners, washers and dryers, and electric water heaters.
Why Choose 50 Amp?
- Capacity: With up to 12,000 watts of power, you can run several appliances simultaneously without worrying about tripping a breaker.
- Luxury Living: If your RV has multiple air conditioners, a washer and dryer, and other high-demand appliances, 50 Amp service ensures you can use them all simultaneously without compromise.
- Future-Proofing: If you are planning on converting your own RV, even if you don’t need all the power now, having a 50 Amp service means your RV can accommodate upgrades and additional appliances down the road.
15/20 Amp Service: Basic and Simple
Some very small RVs or pop-up campers might only require a 15 or 20 Amp service. These hookups are typically used for light loads, like essential lighting and charging small electronic devices. However, this type of service is not suitable for running high-power appliances.
- Plug Configuration: The 15/20 Amp plugs resemble a standard household plug with two flat prongs and one round prong for grounding.
- Usage Reason: Ideal for minimal power requirements, these setups are typically used when only basic electrical needs must be met and frequently when appliances such as stoves and refrigerators may run on propane.
Why Choose 15/20 Amp?
- Minimalist Camping: For those who enjoy a more rustic experience and only need basic lighting and charging capabilities, 15/20 amp service is sufficient.
- Budget-Friendly: Smaller, less power-demanding RVs are typically more affordable and cheaper to operate. This is sufficient for many van campers.
- Flexibility: These hookups can often be found in more remote or primitive camping locations or at friends' houses, providing just enough power for the essentials.
Understanding the different electrical hookups for RVs and how each applies to your specific needs can significantly enhance your RVing experience. Whether using a 15/20 Amp service for minimalist camping or a 50 Amp service for a fully equipped motorhome, knowing your RV’s electrical components and how to power them ensures your RV is powered effectively and safely.
Campground Electrical Hookup Configurations and Considerations
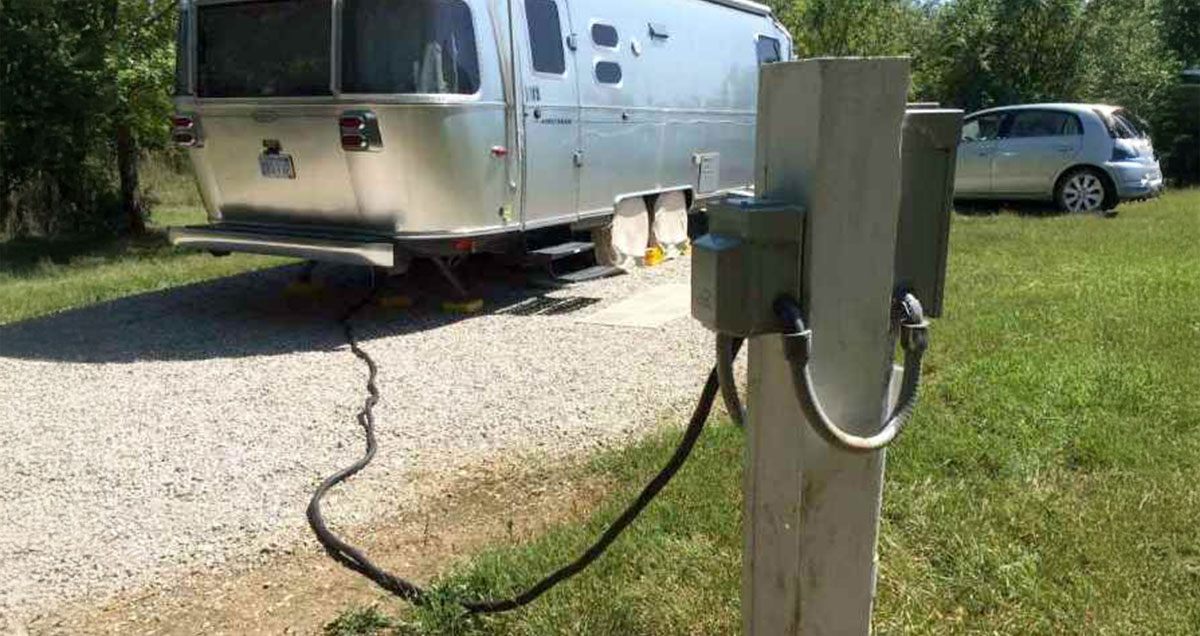
Most campgrounds offer electrical hookups that accommodate RVs' several different amperage requirements. Understanding these configurations and considerations can help ensure you choose the right RV site, are adequately prepared, and make the most of your stay.
30 Amp Hookups
These are the most common in many campgrounds, especially those catering to various RV sizes. A 30-amp hookup provides enough power for mid-sized RVs and ensures that essential systems can operate without overloading.
- Why Choose 30 Amp Hookups?
- Versatility: Suitable for most mid-sized RVs.
- Availability: Many campgrounds, especially older ones, offer 30 Amp service.
- Adequate Power: Sufficient for running essential appliances and one air conditioner simultaneously.
50 Amp Hookups
Larger campgrounds or those designed to accommodate big rigs often provide 50 Amp hookups. These are essential for RVs with high power needs, allowing for the simultaneous operation of multiple large appliances.
- Why Choose 50 Amp Hookups?
- High Capacity: Ideal for larger RVs with high power demands, such as all-electric coaches.
- Multiple Appliances: Supports multiple high-wattage appliances without tripping breakers.
- Luxury RVing: Necessary for RVs equipped with multiple air conditioners, washers, dryers, and other high-demand appliances.
15/20 Amp Hookups
While less common, some campgrounds offer only 15/20 Amp hookups. These are typically found in older or more rustic campgrounds and many state parks. They are suitable for smaller campers or those who do not require extensive electrical usage and are in a more moderate climate.
- Why Choose 15/20 Amp Hookups?
- Rustic Camping: Suitable for minimalist camping experiences.
- Budget-Friendly: Ideal for smaller, less power-demanding RVs.
- Remote Locations: Often found in more remote or primitive camping areas.
Combination Hookups
Many modern campgrounds offer combination hookups, providing both 30 Amp and 50 Amp services at the same site. This flexibility ensures you can find a suitable connection regardless of your RV’s power needs.
- Why Choose Combination Hookups?
- Flexibility: Accommodates a wide range of RV power requirements.
- Convenience: Ensures that all RV types can find suitable power connections.
- Future-Proof: Allows for upgrades or changes in your RV’s power needs.
- Allows you and your friends, with different electrical requirements, to park in the same area.
Additional Campground Considerations
Checking Campground Specifications
Before booking a site, always check the campground’s electrical offerings. Some older campgrounds may only offer 15/20 Amp service, while others might have 30 and/or 50 Amp options. Knowing what’s available helps you plan accordingly and may avoid disappointment later.
Adapter Usage
Sometimes, you might find yourself at a campground where the available amperage doesn’t match your RV’s needs. In such cases, adapters can be a lifesaver. For example, if your RV requires a 50 Amp hookup but only 30 Amp service is available, a 30-to-50 Amp adapter can bridge the gap. However, remember that using a 30 Amp adapter means you will only have 30A of power available, even if it is plugged into a 50A receptacle, so manage your usage accordingly. If you try drawing more power than 30 Amps, your adaptor and other electrical appliances may be damaged.
Power Management
Regardless of the available amperage, efficient power management is key. Avoid running multiple high-wattage appliances simultaneously. Use appliances like air conditioners, microwaves, and electric heaters sparingly to prevent system overload.
Safety Precautions
Always inspect the campground’s electrical pedestal before plugging in your RV. Look for signs of damage, wear, or black burn marks. Campground power supplies can be susceptible to low voltage during high-draw periods and improperly wired connections, which can damage RV appliances.
I strongly recommend a surge protector to protect your RV’s electrical system from potential power surges or faults. Advanced surge protectors will also alert you to wiring issues before damage occurs. If you notice any issues with the power pedestal, report them to the campground management before plugging in.
Peak Usage Times
Be aware of peak usage times, especially in crowded campgrounds. During peak hours, power demand can be high, potentially affecting the stability of the electrical supply. Plan your high-power activities during off-peak hours when possible.
Site Selection
Choose a site that best matches your RV’s power needs. If you have a larger RV with higher power demands, ensure the site you select offers 50 Amp service. A 30 Amp or even a 15/20 Amp site may suffice for smaller RVs or those with fewer power requirements. Some parks charge by how many Amps you are plugged into, so why pay for 50 Amp service when 30 Amp will suffice?
Understanding campground electrical hookup configurations and considerations can ensure a smooth and safe RVing experience. Proper planning and preparation will help you make the most of your stay, whether at a rustic campsite with minimal amenities or a modern campground equipped with all the comforts of home.
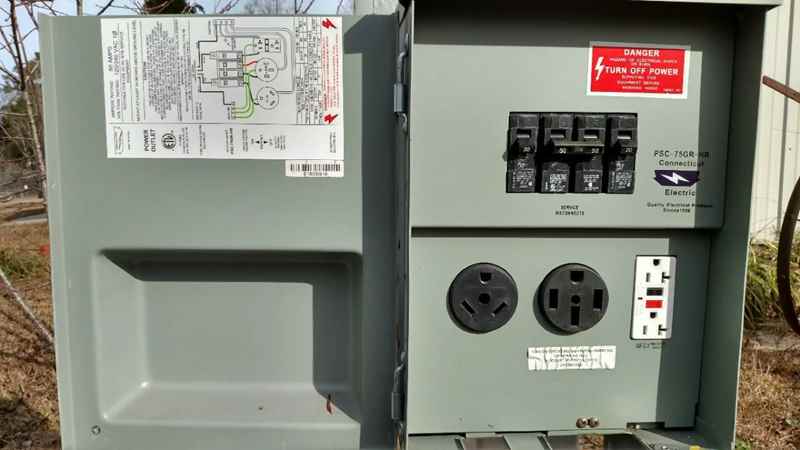
Installing an RV Receptacle at Home: Bringing the Campground to Your House
Publishers Note: If you are unfamiliar with high-voltage electricity, we strongly suggest you hire a licensed Electrician to install a remote receptacle at your home for your RV. This is high voltage, and one mistake during or after the installation can be deadly. Hiring a licensed electrician can provide peace of mind and ensure the job is done correctly and safely and best protect your RV.
Installing an RV receptacle can be a game-changer for RV enthusiasts who want to plug their rig into 30 or 50 Amps at home. This section will guide you through the step-by-step process to set up a 30 or 50-amp RV outlet at your residence, ensuring you can conveniently power your RV without leaving your driveway.
Step 1: Choose the Location
Select a convenient location near where you park your RV, or where a visiting friend may park their RV. Ensure it is accessible and close enough to your main electrical panel to minimize wiring complications. The longer the distance to the main power supply in your house, the higher the voltage drop. It's best to choose a location sheltered from the elements to protect the outlet from rain and debris.
Step 2: Gather Materials
You’ll need the following:
- Appropriate outlet (30 Amp or 50 Amp). Be sure to buy an RV-type outlet, not a household outlet style
- Breaker (30 Amp or 50 Amp)
- Waterproof Outdoor-rated electrical box
- Conduit and wiring (consult your local electrical code for the appropriate gauge for the distance to the main breaker panel)
- Grounding rod and grounding wire (if required)
- Weatherproof covers for the outlet
- GFCI (Ground Fault Circuit Interrupter) protection for added safety
Step 3: Install the Electrical Box
Mount the outdoor-rated electrical box at your chosen location. Secure it properly to withstand outdoor conditions and ensure it is easily reachable from where your RV will be parked. If mounting on an exterior wall, ensure it is well-anchored and sealed to prevent water ingress. Mount it at a height where you can easily plug it in and unplug it, as they sometimes stick. Try to avoid mounting your receptacle where a puddle may pool underneath.
Step 4: Run the Conduit and Wiring
From your main electrical panel, run the conduit to the location of the electrical box. Inside the conduit, pull the appropriate gauge wire for your chosen amperage. For a 30 Amp service, typically a 10-gauge wire is used, while a 50 Amp service requires a 6-gauge wire. Note: For longer runs than average, larger gauge wire may be required due to a loss in resistance. Plan the conduit route carefully to minimize bends and turns, making it easier to pull the wire through. Use appropriate fittings to secure the conduit to the wall, and the electrical box and the main panel.
Step 5: Install the Circuit Breaker
Turn off the main power supply before working in the electrical panel. Install the appropriate breaker (30 Amp or 50 Amp) into your main panel. Connect the wiring to the breaker, ensuring all connections are tight and secure. Label the breaker clearly in your panel to avoid confusion later.
Step 6: Connect the Outlet
Connect the wiring to the RV outlet according to the manufacturer’s instructions. Ensure all connections are correct and secure and it is properly grounded. Follow the outlet manufacturer’s instructions closely. Ensure the ground wire is properly connected to the grounding terminal. Double-check all connections before proceeding to the next step.
Step 7: Test the Installation
Once everything is connected, turn the power back on and test the outlet with a multimeter to ensure it’s providing the correct voltage and polarity. Plug your RV in and test the systems to confirm they work correctly. Verify that the correct voltage is present and that there are no issues with grounding. Test the outlet by plugging in your RV and turning on one or more high-wattage devices to ensure it handles the load without tripping the breaker.
Safety Considerations
Always adhere to local electrical codes and regulations. If you’re uncomfortable working with electricity, hiring a licensed electrician to perform the installation is advisable. Safety should always be your top priority. Electricity is dangerous, and proper installation is crucial for safety. A licensed electrician can ensure your setup meets all local codes and regulations.
Additional Tips for Home Installation
Weatherproofing
Ensure that the outdoor electrical box and outlet are adequately weatherproofed. This will protect the installation from the elements and prolong its lifespan. Use weatherproof covers and sealants to keep moisture, bugs, and rodents out.
Labeling
Label your new RV outlet and the corresponding breaker in your electrical panel clearly. This will make it easier to identify and manage the connection in the future.
Routine Checks
Perform routine checks of your RV outlet to ensure it remains in good condition. Look for signs of wear, corrosion, or damage, and address any issues promptly to maintain a safe and functional setup.
Professional Assistance
Installing an RV receptacle at home can greatly enhance your RVing experience by providing a convenient and reliable power source. You can ensure a smooth and successful installation by following the steps outlined above and taking necessary safety precautions. Whether preparing for a big trip or simply maintaining your RV, having a home power setup can make all the difference.
Final Thoughts
Understanding the different electrical hookups for RVs and how to install a home receptacle can significantly enhance your RVing experience. Whether at a campground or keeping the RV plugged in at home, having the right connectors, adapters, and power supplies ensures your RV adventures are powered smoothly and safely.
Article written by Richard Gastmeier
Richard publishes several websites in the outdoor recreation niche. These sites offer valuable information and products related to the outdoor lifestyle.
Richard has a wealth of experience in the niche over the last twenty years, founding and managing RV Part Shop and as an avid RV traveler and camper. He is also an aspiring boater.
To be the first to read all new articles and to read thousands of articles about conversions back to 1992, become a member of BCM.
Click HERE to become a Member now!Click on any image in this column
to open the company's website.
to open the company's website.